Both shot in St Augustine, Fl..... the lighthouse was first
and on the way home, down A1A came the longest line
of pelicans that I had ever seen. Not a blend but an
example of a shot made more interesting through addition.
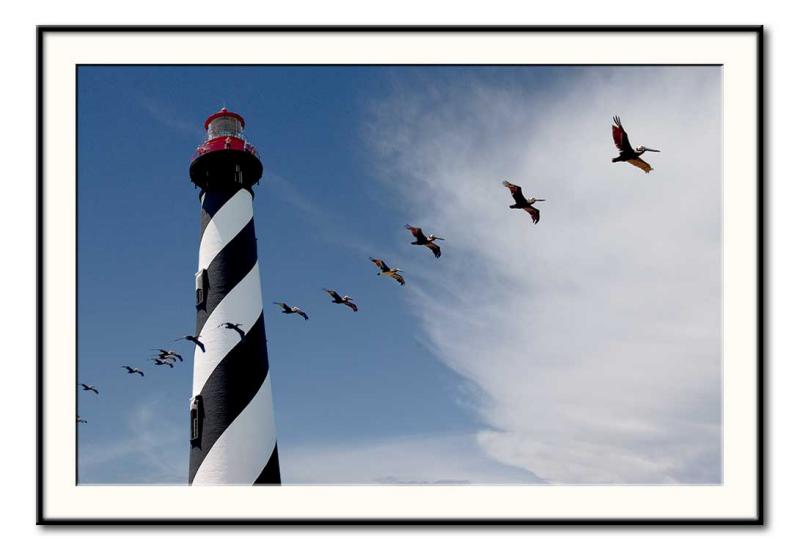
Great job of blending. The addition of the Pelicans really makes the composition.
Mike
The GetDPI Photography Forum
Great to see you here. Join our insightful photographic forum today and start tapping into a huge wealth of photographic knowledge. Completing our simple registration process will allow you to gain access to exclusive content, add your own topics and posts, share your work and connect with other members through your own private inbox! And don’t forget to say hi!
shoot now and create later
- Thread starter mregnier
- Start date
hodad66
Member
pelicans.... top layer, lighthouse .... middle layer, sky bottom layer>simply deleting and layers.....
This would not work for a pelican over the lighthouse")
no blending just normal layers...... :deadhorse:
Re: Saturn Night River
Big leap and improvement from the original 2 stitched shots.
mike
Very nice shot. I see lots of possible tight crops as well in the reflections in the water. Also, was curious if you looked at it in B&W as well.Here's a 1+1+1=5 version


and with a little help from my tablet

Big leap and improvement from the original 2 stitched shots.
mike
ustein
Contributing Editor
My texture blending technique:
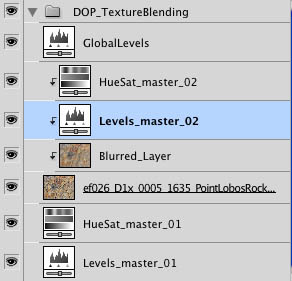
Here is a brief description of the layers and their use (bottom to top):
* Levels_Master_01: Controls the brightness, black and white point of the background layer
* HueSat_Master_01: Controls the saturation of the background layer
* Blending Layer: This layer gets the name of the image used for blending (to help find this image later). The blending mode of this layer is by default to "Multiply". You can change the blending mode but we most often get the best results using Multiply.
* Blurred Layer: This is a blurred version of the blending layer. The opacity is 50% by default. You can control the blur of the blending by changing the opacity form 0-100%
* Levels_Master_02: Controls the brightness, black and white point of the blending layer
* HueSat_Master_02: Controls the saturation of the blending layer
* GlobalLevels: Allows to tune the brightness, black and white point of the blended result
* DOP_TextureBlending Group: Tuning the opacity of this group allows to adjust the overall blending strength.
Of course there are many more options:
- Add effects
- Use masks
- use the script multiple times with different textures
Our script creates this structure and resizes the texture to match the background layer.


ustein
Contributing Editor
Did you create the texture?Cloud Landing
texture layer

final composite, with lots of other adjustments.

Mike
It was made from an 8x10 piece of film in the darkroom which had been scratched on the floor and developed. A friend of mine actually made this. We both were working in the same style with film and we would share textures and then combine textures as well.Did you create the texture?
It's much easier to make texture these days with a scanner and computer to layer different textures together.
mike
kwalsh
New member
Huh... I was never interested in blends and what not, but I am quite taken by some of the examples here. Now that I live far away from my favorite subjects and don't get to visit them regularly I might have to give this a try to keep the creative juices flowing as it were. Thanks for posting!
Ken
Ken
m3photo
New member
Re: Saturn Night River
I sometimes see the need to convert some of my individual texture files to B&W but this image works better with colour.
Thanks BossVery nice shot. I see lots of possible tight crops as well in the reflections in the water. Also, was curious if you looked at it in B&W as well.
Big leap and improvement from the original 2 stitched shots.
mike
I sometimes see the need to convert some of my individual texture files to B&W but this image works better with colour.
ustein
Contributing Editor
All textures are custom. There is only one texture where I used a stock texture (paper) and then made my own (again through blending of courseUwe, I very much like your blends! Do you shoot the texture as well or do you get it from a database?
).Have now to wade through 60K of images to find more textures. My process is described in this thead. Good for us that we always liked to photograph textures. Also my textures are all between 6-21MP.


thanks. I find it interesting to see how everyone is working with their images.wow this is cool love the tutorial screen shots!!
mike
ustein
Contributing Editor
Poppy shot is great. What blending mode are you using?shot this photo out of the car window driving thru France. I wasn't the one driving!
Mike