The GetDPI Photography Forum

Great to see you here. Join our insightful photographic forum today and start tapping into a huge wealth of photographic knowledge. Completing our simple registration process will allow you to gain access to exclusive content, add your own topics and posts, share your work and connect with other members through your own private inbox! And don’t forget to say hi!

OK, enough with the equipment, lets see some lighting!

fotografz

Well-known member
Thank you fotografz,

that was exactly the idea behind that shot.
And after a long day of work have some cognac or armagnac
and watch the sun go down.

I love my job: its just the work that I hate.

Y Sol
LOL! Yes, but the work is worth it when you get what you were after. My motto is to make the assistants work, and for me to do more of what I love ... ;)

Many folks forget how cool it is to work with "hot" lights ... which are better referred to as "continuous" lighting.
 

LJL

New member
Y Sol,
That second shot you posted with the bottles in focus reminded me of coming back to the small but interesting hotels and inns in Scotland, where upon arriving after a day of whatever work, there was always a bottle or two of some local and very interesting single malt on a table with some glasses. You poured yourself a small glass, took a seat in a comfy leather chair and started the unwinding process. Usually you were joined by others for a brief spell. I remember how relaxing that entire experience was, and both of your shots brought those memories back. Thanks for sharing these shots.

LJ
 

jlm

Workshop Member
funny, my wife just ordered a couple of club chairs and i used your photo to illustrate the mood. i'm hoping bourbon will substitute for scotch or cognac when i kick back in that long light, end of the day setting.

your photo was a success!
 
R

Ranger 9

Guest
My motto is to make the assistants work, and for me to do more of what I love ... ;)

Many folks forget how cool it is to work with "hot" lights ... which are better referred to as "continuous" lighting.
The assistants, who presumably are the ones who have to burn themselves setting up and moving them, probably will still refer to them as "hot lights"... or more likely, "@#$% hot &$#*ing lights"...
 
R

Ranger 9

Guest
I learned something last weekend when I did this promo shot for an upcoming modern dance concert:


Most of the setup was typical for how I do these. To get the background (just a light-colored wall) to go white, I aimed two heads (one about 8' high and the other about 3' high) at the wall from one side and one head (about midway between the others in height) from the other. I set the basic exposure to just blow out the wall to white, using the camera histogram for reference. Then I set the power on the front light to provide correct subject exposure at the same setting. (I've sketched a diagram and will add it later.)

What was different about this vs. my usual formula was that in the past, I've always run my main light through a 36-inch octagonal softbox to give nice soft light. This time, I used a 16-inch "beauty dish" with a spun aluminum interior (the cheap one that Ephoto Discounters used to sell for about $35; would post a link, but they don't list it right now.)

I had half-feared that dish would produce light that was too harsh -- but there was so much bounceback from the white wall that the shadows filled in nicely, I think.

What I liked about the dish was that the crisper shadows made the dancers' muscles look more defined -- look at the arms of the woman on the right, for example. (By the way, can you believe that she's a mother of five?!?)

Another advantage of the dish is that because it's so much more efficient than the softbox, I could position it farther away -- about 12 feet from the subjects -- and still get enough exposure. Putting the light farther away meant less variation between subjects closer to the light and subjects farther from the light (because a given distance change is a smaller percentage of the total distance.) That gave the dancers a bigger space in which they could move without my having to worry about exposure changes.

So, I learned that a "harder" light doesn't need to be harsh, and a smaller light can give more even exposure than a larger one! Counter-intuitive (for me) but good to know...
 
J

Jonathan H

Guest
Here's a piece I wrote for Strobist sometime last year, but I figure it's pretty appropriate for the conversation. Enjoy!

As many of the incoming members to this group already know, one of the most important ways to add drama and visual impact to a photograph is through the use of lighting. I imagine many of the photographers coming into this new group are coming in from the Strobist group and very possibly new to the whole idea of strobe lighting. I'm going to describe a bit of the thought process that goes into conceptualizing a photograph, and then deciding HOW to light the subject, based on the final concept dreamed up.

When I first got into this whole lighting thing, before Strobist even existed, (but not too long ago... I'm still a young'un), I didn't know very much at all about actually designing light. I just blasted my subject with light from an arbitrary angle, usually 45 degrees off the camera's axis, and only because that's what I'd seen once or twice in a book. Or something. As I shot more and more and really began to study the effects of lighting, I began to see how light and shadow interact, how they effect the dynamic of a photograph, and how to best use them to create compelling imagery. Being able to instinctively see the light that will eventually shoot forth for 1/3000 of a second is the keystone to becoming a competent studio photographer. Of course, this holds true both in the studio or on location, with large, powerful studio lighting, or small and light Vivitar 285's.

I'd like to present one of my recent photos. This was shot as a personal piece for stock and more importantly, for pure enjoyment.


In climbing, there's a move called a "dyno" - short for "dynamic." Essentially, it's a "dynamic" jump which allows you to reach a hold that you would otherwise not be able to reach because it's too far away. Dynos require a substantial amount of strength and athleticism - I wanted to showcase the jump, the climber's feet swinging in mid air, and the intense level of overall body strength required to pull off the move. I grabbed my insanely strong buddy Simon to help me pull it off.
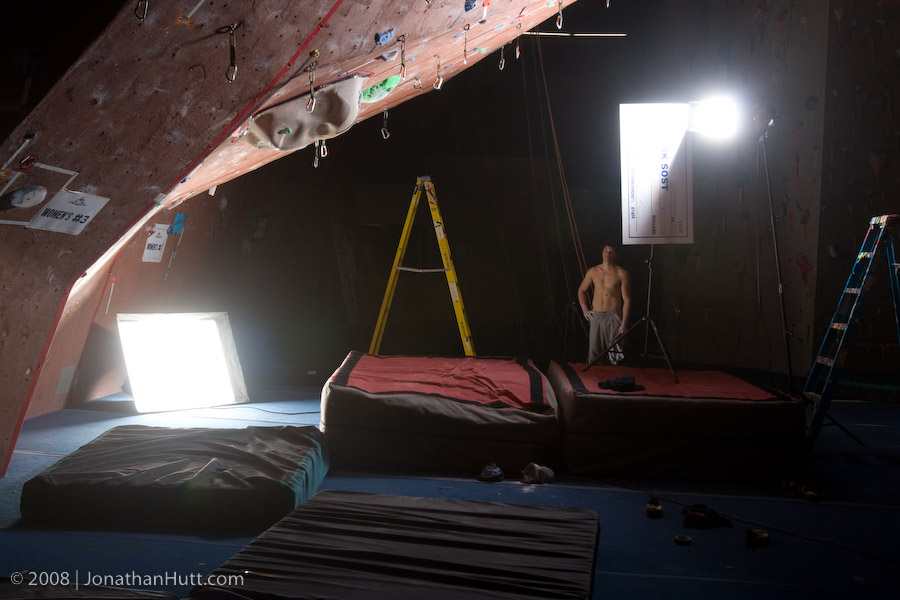
Set up shot:


As you can see, this was a 2-light shot. I was standing on the yellow ladder, shooting towards the camera's current perspective. Down low you see a large 3'x4' softbox. This illuminated the wall (to give context) and obviously, lit Simon as well. The second softbox (up high) is a 1'x3' strip box positioned horizontally directly behind Simon and gives the gorgeous highlight (if I do say so myself) along his shoes. I set it up this way both for 'flair' and to separate his black shoes from the dark interior of the climbing gym.

The large white fake check was only added as an afterthought. I was getting substantial lens flare from the stripbox and needed a flag, but I had left all my grip equipment back at the studio and needed to improvise. I pulled the fake check off the wall (with the permission of management, of course) and gaffer taped it to another light stand. Worked like a charm :)

The whole point of this: I could just as easily have been lazy and put up the key light on a stand next to me on the ladder, but that wouldn't have illuminated the rest of wall as evenly. In fact, that's where I initially positioned it. However, I was unhappy with my results and spent a bit of time searching for a better light position until I found what's seen in the above shot. Had the strip box been positioned anywhere but directly behind him, the characteristics of the light would have been totally different and not given the smooth highlight along his soles and legs, but a harsher rim light, which I didn't want.

Actually having a purpose and a plan for your lighting is absolutely essential to turning out polished work. Learn the behaviors of your modifiers inside and out so you can accurately predict how each will shape the light... don't guess and check during a live shoot. Once you bore your model (or in this case, exhaust your climber), you've probably "lost the battle."

I hope this kicks off a great new group and I'm hoping to learn even more than I'm planning to share. Happy shooting!

-Jonathan

(Oh, for what it's worth, those were Dynalite 4040 heads inside Chimera softboxes, each running off an individual Dynalite 1000WS pack).
 

Frank Doorhof

New member
Hi,
Shot with strobes (2 to be precise) and because there were lights in the dress asked the model to stay very still and used a 1/4th of second shutter time to also register the lights.


Corlan F.

Subscriber Member
Two catalog shots, using El. BX:

product shot detail, 2 strobes, one sb + one snoot/grid 12 - white background


atmosphere shot, 1 strobe beauty dish roughly 45/45° plus... wrapped paper sheet diagonally attached to dish front... - white background
 

Jeremy

New member
Working on a set of images on my printing process:


Lit by 1 Photek Softliter ii:


Here are 2 more images for the project:


Jeremy

New member
BEAUTIFUL!

Care to explain your printing process?

-Marc
Marc, you don't know much this makes my day as I've followed your work on photo.net for many, many years and have been inspired by countless shots you've posted.

I print in gum bichromate over palladium if that helps--I make a palladium print then 1 or more gum bichromate layer on top of that. It's a very labor intensive process I find immensely rewarding. The images are made while I am actually printing one of the earlier imagges. I started with an image of my brush, for example, and made the image of the palladium drops while measuring to coat this print:


Here's a little blurb about the project I had to write for a show submission:

These images are from the series Process in which I explore the creation of the print and the value of process. The series breaks the notion of "craft" down into discrete photographs of the steps and tools involved in the process to investigate the relationship between the tangible and intangible. My method, inspired by gestalt psychology and phenomenology, builds upon earlier bodies of work examining such ideas as "the sacred" and "suburbia".
This is actually a project I've had noodling in my brain for some time. My dominant arm is sling-bound for the foreseeable future, though, so I decided it was time to get started as I can still do these with one hand--they just take a while as I only have the one hand and am having to re-train myself to coat paper with my left hand:banghead:
 
Last edited:

fotografz

Well-known member
Marc, you don't know much this makes my day as I've followed your work on photo.net for many, many years and have been inspired by countless shots you've posted.

I print in gum bichromate over palladium if that helps--I make a palladium print then 1 or more gum bichromate layer on top of that. It's a very labor intensive process I find immensely rewarding.

Here's a little blurb about the project I had to write for a show submission:


This is actually a project I've had noodling in my brain for some time. My dominant arm is sling-bound for the foreseeable future, though, so I decided it was time to get started as I can still do these with one hand--they just take a while :banghead:

This is an example of one of gum over prints that I may have posted in the alt process thread running around on here:

I have always loved some of the pure processes of photography ... which are totally lost on the internet/digital crowd ... there is just something about seeing a hand done print in person using some of the elaborate and time intense processes available.

Hats off to you not only for the work itself, but for craftsmanship and loving hand required to make things of such beauty. :thumbs:

PLease post more ... perhaps in the analog threads where it will garner a wider audience and much earned appreciation.

-Marc
 

Jeremy

New member
A few more of the lighting shots and a variant on the distilled h2o picture (i'm curious what others think about the 2 choices)


mrtoml

New member
I got my first studio light setup last week (Elinchrom D-Lite-4 2 head kit). Been practising today with my daughter.

I'm just getting to grips with one light at the moment. These were shot through an umbrella at 45% and above the model (to camera left) with a silver reflector on the other side.


Top