The GetDPI Photography Forum
Great to see you here. Join our insightful photographic forum today and start tapping into a huge wealth of photographic knowledge. Completing our simple registration process will allow you to gain access to exclusive content, add your own topics and posts, share your work and connect with other members through your own private inbox! And don’t forget to say hi!
Behind the scenes
- Thread starter danlindberg
- Start date
FloatingLens
Well-known member
Yes, I can second that. I was surprised how well the correction of my Apo-Symmar 5,6/150 translates also to digital use.In the meanwhile, an Apo-Sironar-S 180mm doesn‘t cost that much (at least compared to the newer Rodenstock lenses) and is very nice too! Initially I wanted to buy a Digitar 180/210, but they are kind of rare. Now I have a nice performing lens for 4x5 AND digital.
As others (including myself) have noted in other threads, the Hasselblad V lenses in this focal length range hold up quite well. Here's a link to an image I made a while back with my old 150 C, flat-stitched from +/- 15mm shifts on the IQ3100 54x40mm sensor.

I find the image to be surprisingly sharp pretty far out to the edges, considering the atmospheric conditions and the lens's reputation as not being the sharpest tool in the shed. The 180 is a bit sharper but I didn't do much shifting and stitching with my 180 CF before selling it. So, if the Rodie is out of reach, you might consider these old Zeiss lenses as alternatives. Cambo sells both shutterless (dumb) and shutter-activating adapters.
John
rdeloe
Well-known member
You can have two very different experiences with a Componon-S 180/5.6. It's entirely possible to put it on your camera and conclude that it's OK closed down in terms of sharpness, but has low contrast and is subject to horrendous flare. I've had that exact experience. Or, with the very same lens, you can find that it's high contrast, very sharp across the whole frame and shifted 20+mm, and very resistant to flare.
This happens because it is extremely prone to veiling flare. The image circle on a CPN-S 180/5.6 was designed to enlarge 5x7 negatives, so it's massive. It takes in an enormous amount of light, most of which ends up bouncing around and causing so much veiling flare that it's unusable. I tried everything before I gave up and put it on eBay. My last attempt was an 8" hood and a mask that left a tiny 25mm hole. It still didn't work.
I pulled it off eBay when I finally realized that the problem was at the back end, not the front. I was able to eliminate the veiling flare by flocking the inside of the adapter I was using to put the lens on my Toyo lens board, and then installing a baffle in the rear of the adapter. Top-left is the lens. I put cells from a 2000-era lens in a 1970s-era iris mount because I like the old style that has 19 blades. The aluminum adapter I use to mount it to the Toyo board is on the right in that picture. The top-right picture shows the baffle. It goes in the bottom of the adapter.

The next thing that makes a major difference at wide apertures is this "beehive hood" (picture at bottom-right). It's made out of step-down rings. I used them to figure out the smallest hole to leave. In this picture the opening is 26mm. That's all that's needed to easily cover the sensor, with only a slight amount of vignetting. I use it when I need maximum sharpness across the frame and am not shifting more than a few mm. Normally I take off the top ring, exposing the 30mm ring I used to make the picture at the link (above). Light fall-off is dramatically reduced. Warren, you asked about using an LCC. There's actually no need to use an LCC if I don't use this hood, and instead using a standard screw-in hood. However, if I'm shifting with the 30mm opening, an LCC frame definitely cleans things up.
The difference between the lens with the 26mm opening and with a standard hood is actually remarkable. As best I can tell, what's happening is that the opening in the "beehive hood" is acting as an aperture and defining the entrance pupil. A 26mm opening turns a 180mm lens into an f/7 lens. But that's not the whole story. If I showed a comparison of f/7 with this beehive hood, and f/7 with a standard hood, the beehive hood version is still much better. I think what's happening is that the 26mm opening further reduces glare at the edges, increasing contrast and thus making the image look sharper.
The benefit of the 26mm beehive hood versus the 30mm hood is reduced at f/8 and gone by f/11. However, it's still always better than the standard hood, which really doesn't do anything to reduce the amount of light getting into the lens -- so I leave that funny looking beehive hood on all the time.
At one point I was looking seriously for an Apo-Digitar 180/5.6, but since I've figured this out I haven't bothered. If you compare the Schneider documentation for the two lenses, you might conclude that the Componon-S is the progenitor of the Apo-Digitar. The block diagram is similar but has some key differences, so it's definitely not the same lens. However, the MTF curves are not that far apart once you account for the fact that Schneider closed the image circle down significantly on the Apo-Digitar, perhaps in recognition that all the larger image circle was doing was capture stray light.
By the way, where the Componon-S 180/5.6 is good, the Componon-S 150/5.6 is better! I just received #3 yesterday and put it through its paces. It's superb ... once you take care of the veiling flare and put a 30mm beehive hood on it. I sold the first two because I thought they were unusable.
This happens because it is extremely prone to veiling flare. The image circle on a CPN-S 180/5.6 was designed to enlarge 5x7 negatives, so it's massive. It takes in an enormous amount of light, most of which ends up bouncing around and causing so much veiling flare that it's unusable. I tried everything before I gave up and put it on eBay. My last attempt was an 8" hood and a mask that left a tiny 25mm hole. It still didn't work.
I pulled it off eBay when I finally realized that the problem was at the back end, not the front. I was able to eliminate the veiling flare by flocking the inside of the adapter I was using to put the lens on my Toyo lens board, and then installing a baffle in the rear of the adapter. Top-left is the lens. I put cells from a 2000-era lens in a 1970s-era iris mount because I like the old style that has 19 blades. The aluminum adapter I use to mount it to the Toyo board is on the right in that picture. The top-right picture shows the baffle. It goes in the bottom of the adapter.
The next thing that makes a major difference at wide apertures is this "beehive hood" (picture at bottom-right). It's made out of step-down rings. I used them to figure out the smallest hole to leave. In this picture the opening is 26mm. That's all that's needed to easily cover the sensor, with only a slight amount of vignetting. I use it when I need maximum sharpness across the frame and am not shifting more than a few mm. Normally I take off the top ring, exposing the 30mm ring I used to make the picture at the link (above). Light fall-off is dramatically reduced. Warren, you asked about using an LCC. There's actually no need to use an LCC if I don't use this hood, and instead using a standard screw-in hood. However, if I'm shifting with the 30mm opening, an LCC frame definitely cleans things up.
The difference between the lens with the 26mm opening and with a standard hood is actually remarkable. As best I can tell, what's happening is that the opening in the "beehive hood" is acting as an aperture and defining the entrance pupil. A 26mm opening turns a 180mm lens into an f/7 lens. But that's not the whole story. If I showed a comparison of f/7 with this beehive hood, and f/7 with a standard hood, the beehive hood version is still much better. I think what's happening is that the 26mm opening further reduces glare at the edges, increasing contrast and thus making the image look sharper.
The benefit of the 26mm beehive hood versus the 30mm hood is reduced at f/8 and gone by f/11. However, it's still always better than the standard hood, which really doesn't do anything to reduce the amount of light getting into the lens -- so I leave that funny looking beehive hood on all the time.
At one point I was looking seriously for an Apo-Digitar 180/5.6, but since I've figured this out I haven't bothered. If you compare the Schneider documentation for the two lenses, you might conclude that the Componon-S is the progenitor of the Apo-Digitar. The block diagram is similar but has some key differences, so it's definitely not the same lens. However, the MTF curves are not that far apart once you account for the fact that Schneider closed the image circle down significantly on the Apo-Digitar, perhaps in recognition that all the larger image circle was doing was capture stray light.
By the way, where the Componon-S 180/5.6 is good, the Componon-S 150/5.6 is better! I just received #3 yesterday and put it through its paces. It's superb ... once you take care of the veiling flare and put a 30mm beehive hood on it. I sold the first two because I thought they were unusable.
Last edited:
FloatingLens
Well-known member
Fascinating! Thanks for your insight. This pretty much reflects my experiments with the G-Claron 9/210 (using paper positives), hence my question. The excess light caused really unusual patterns of low contrast in the resulting image, which was why I did not consider this kind of uncoated enlarging lens for serious photography use. Sharpness is definitely not the problem. That said, they were obviously optimized for collimated light.You can have two very different experiences with a Componon-S 180/5.6. It's entirely possible to put it on your camera and conclude that it's OK closed down in terms of sharpness, but has low contrast and is subject to horrendous flare. I've had that exact experience. Or, with the very same lens, you can find that it's high contrast, very sharp across the whole frame and shifted 20+mm, and very resistant to flare.
This happens because it is extremely prone to veiling flare. The image circle on a CPN-S 180/5.6 was designed to enlarge 5x7 negatives, so it's massive. It takes in an enormous amount of light, most of which ends up bouncing around and causing so much veiling flare that it's unusable. I tried everything before I gave up and put it on eBay. My last attempt was an 8" hood and a mask that left a tiny 25mm hole. It still didn't work.
I pulled it off eBay when I finally realized that the problem was at the back end, not the front. I was able to eliminate the veiling flare my flocking the inside of the adapter I was using to put the lens on my Toyo lens board, and then installing a baffle in the rear of the adapter. Top-left is the lens. I put cells from a 2000-era lens in a 1970s-era iris mount because I like the old style that has 19 blades. The aluminum adapter I use to mount it to the Toyo board is on the right in that picture. The top-right picture shows the baffle. It goes in the bottom of the adapter.
View attachment 182995
The next thing that makes a major difference at wide apertures is this "beehive hood" (picture at bottom-right). It's made out of step-down rings. I used them to figure out the smallest hole to leave. In this picture the opening is 26mm. That's all that's needed to easily cover the sensor, with only a slight amount of vignetting. I use it when I need maximum sharpness across the frame and am not shifting more than a few mm. Normally I take off the top ring, exposing the 30mm ring I used to make the picture. Light fall-off is dramatically reduced. Warren, you asked about using an LCC. There's actually no need to use an LCC if I don't use this hood, and instead using a standard screw-in hood. However, if I'm shifting with the 30mm opening, an LCC frame definitely cleans things up.
The difference between the lens with the 26mm opening and with a standard hood is actually remarkable. As best I can tell, what's happening is that the opening in the "beehive hood" is acting as an aperture and defining the entrance pupil. A 26mm opening turns a 180mm lens into an f/7 lens. But that's not the whole story. If I showed a comparison of f/7 with this beehive hood, and f/7 with a standard hood, the beehive hood version is still much better. I think what's happening is that the 26mm opening further reduces glare at the edges, increasing contrast and thus making the image look sharper.
The benefit of the 26mm beehive hood versus the 30mm hood is reduced at f/8 and gone by f/11. However, it's still always better than the standard hood, which really doesn't do anything to reduce the amount of light getting into the lens -- so I leave that funny looking beehive hood on all the time.
At one point I was looking seriously for an Apo-Digitar 180/5.6, but since I've figured this out I haven't bothered. If you compare the Schneider documentation for the two lenses, you might conclude that the Componon-S is the progenitor of the Apo-Digitar. The block diagram is similar but has some key differences, so it's definitely not the same lens. However, the MTF curves are not that far apart once you account for the fact that Schneider closed the image circle down significantly on the Apo-Digitar, perhaps in recognition that all the larger image circle was doing was capture stray light.
By the way, where the Componon-S 180/5.6 is good, the Componon-S 150/5.6 is better! I just received #3 yesterday and put it through its paces. It's superb ... once you take care of the veiling flare and put a 30mm beehive hood on it. I sold the first two because I thought they were unusable.
diggles
Well-known member
Not sure you can call this a 'poor man's' lens, more like an 'inventive man's' lens!You can have two very different experiences with a Componon-S 180/5.6. It's entirely possible to put it on your camera and conclude that it's OK closed down in terms of sharpness, but has low contrast and is subject to horrendous flare. I've had that exact experience. Or, with the very same lens, you can find that it's high contrast, very sharp across the whole frame and shifted 20+mm, and very resistant to flare.
This happens because it is extremely prone to veiling flare. The image circle on a CPN-S 180/5.6 was designed to enlarge 5x7 negatives, so it's massive. It takes in an enormous amount of light, most of which ends up bouncing around and causing so much veiling flare that it's unusable. I tried everything before I gave up and put it on eBay. My last attempt was an 8" hood and a mask that left a tiny 25mm hole. It still didn't work.
I pulled it off eBay when I finally realized that the problem was at the back end, not the front. I was able to eliminate the veiling flare by flocking the inside of the adapter I was using to put the lens on my Toyo lens board, and then installing a baffle in the rear of the adapter. Top-left is the lens. I put cells from a 2000-era lens in a 1970s-era iris mount because I like the old style that has 19 blades. The aluminum adapter I use to mount it to the Toyo board is on the right in that picture. The top-right picture shows the baffle. It goes in the bottom of the adapter.
View attachment 182995
The next thing that makes a major difference at wide apertures is this "beehive hood" (picture at bottom-right). It's made out of step-down rings. I used them to figure out the smallest hole to leave. In this picture the opening is 26mm. That's all that's needed to easily cover the sensor, with only a slight amount of vignetting. I use it when I need maximum sharpness across the frame and am not shifting more than a few mm. Normally I take off the top ring, exposing the 30mm ring I used to make the picture at the link (above). Light fall-off is dramatically reduced. Warren, you asked about using an LCC. There's actually no need to use an LCC if I don't use this hood, and instead using a standard screw-in hood. However, if I'm shifting with the 30mm opening, an LCC frame definitely cleans things up.
The difference between the lens with the 26mm opening and with a standard hood is actually remarkable. As best I can tell, what's happening is that the opening in the "beehive hood" is acting as an aperture and defining the entrance pupil. A 26mm opening turns a 180mm lens into an f/7 lens. But that's not the whole story. If I showed a comparison of f/7 with this beehive hood, and f/7 with a standard hood, the beehive hood version is still much better. I think what's happening is that the 26mm opening further reduces glare at the edges, increasing contrast and thus making the image look sharper.
The benefit of the 26mm beehive hood versus the 30mm hood is reduced at f/8 and gone by f/11. However, it's still always better than the standard hood, which really doesn't do anything to reduce the amount of light getting into the lens -- so I leave that funny looking beehive hood on all the time.
At one point I was looking seriously for an Apo-Digitar 180/5.6, but since I've figured this out I haven't bothered. If you compare the Schneider documentation for the two lenses, you might conclude that the Componon-S is the progenitor of the Apo-Digitar. The block diagram is similar but has some key differences, so it's definitely not the same lens. However, the MTF curves are not that far apart once you account for the fact that Schneider closed the image circle down significantly on the Apo-Digitar, perhaps in recognition that all the larger image circle was doing was capture stray light.
By the way, where the Componon-S 180/5.6 is good, the Componon-S 150/5.6 is better! I just received #3 yesterday and put it through its paces. It's superb ... once you take care of the veiling flare and put a 30mm beehive hood on it. I sold the first two because I thought they were unusable.
rdeloe
Well-known member
Not sure you can call this a 'poor man's' lens, more like an 'inventive man's' lens!
") I'm glad I gave it a second chance. If you want to see how it does at other apertures, or how the CPN-S 150/5.6 (which is even better) does, all the files are here: https://drive.google.com/drive/folders/1mIInzlyRvnMKS-MLOEdVjwX5gkNY3Xqn?usp=sharing
I'm glad I gave it a second chance. If you want to see how it does at other apertures, or how the CPN-S 150/5.6 (which is even better) does, all the files are here: https://drive.google.com/drive/folders/1mIInzlyRvnMKS-MLOEdVjwX5gkNY3Xqn?usp=sharing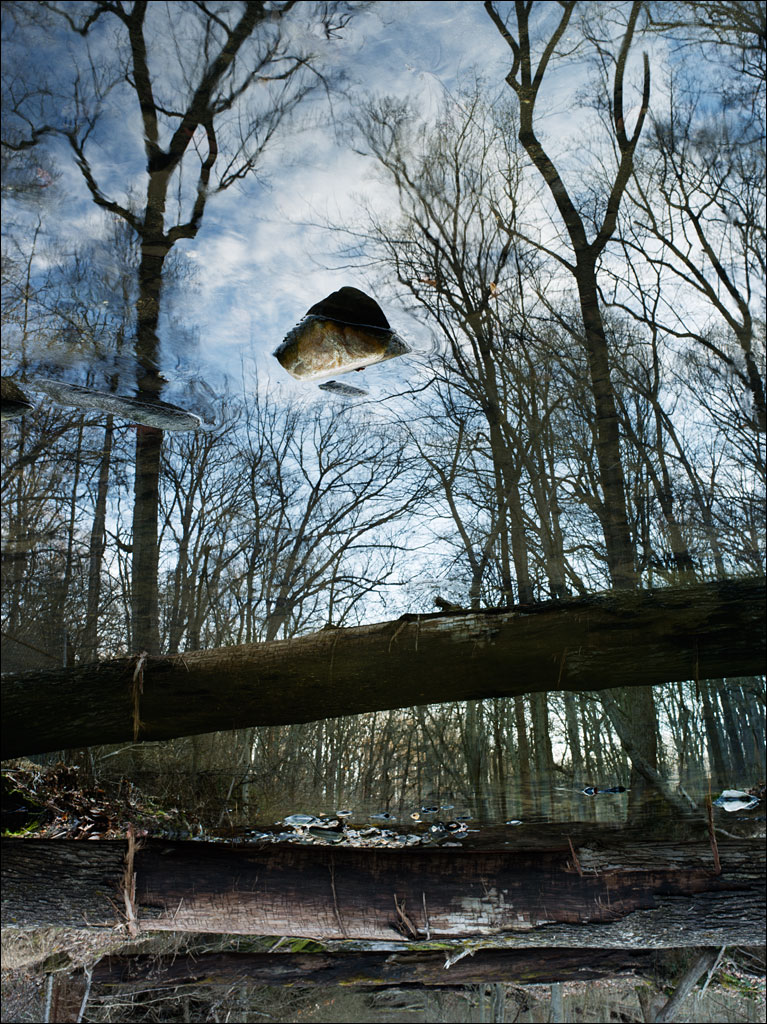

Testing the newly arrived Nikkor SW 90mm f/8 on the Cambo Actus G. Three images across (fully shifted), two rows high to get enough pixels for a 3:1 crop without sacrificing the horizontal resolution. I like the Nikkor!
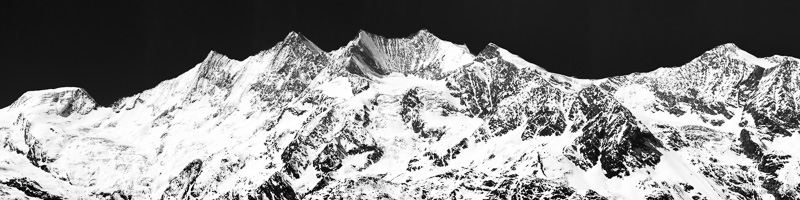
Shot from Maleny on Queensland's Sunshine Coast, overlooking the Glasshouse Mountains, so named by Captain James Cook. Stitched with PT Gui Pro. S1R on the back, shooting in high res mode.
All four sections of the RRS tripod were fully extended, and it was on a slope, so a small step ladder was used to reach the top. Ordinary light, so as usual I will keep returning until I'm happy.
rdeloe
Well-known member
That works! I'm glad the lens will work for you. You're in a landscape made for panoramas.Testing the newly arrived Nikkor SW 90mm f/8 on the Cambo Actus G. Three images across (fully shifted), two rows high to get enough pixels for a 3:1 crop without sacrificing the horizontal resolution. I like the Nikkor!
Shot from Maleny on Queensland's Sunshine Coast, overlooking the Glasshouse Mountains, so named by Captain James Cook. Stitched with PT Gui Pro. S1R on the back, shooting in high res mode.
All four sections of the RRS tripod were fully extended, and it was on a slope, so a small step ladder was used to reach the top. Ordinary light, so as usual I will keep returning until I'm happy.
View attachment 183087
View attachment 183088
citizin
Active member
Greg Haag
Well-known member
This is taking BTS to a whole new level, thanks for sharing, stay safe!!
diggles
Well-known member
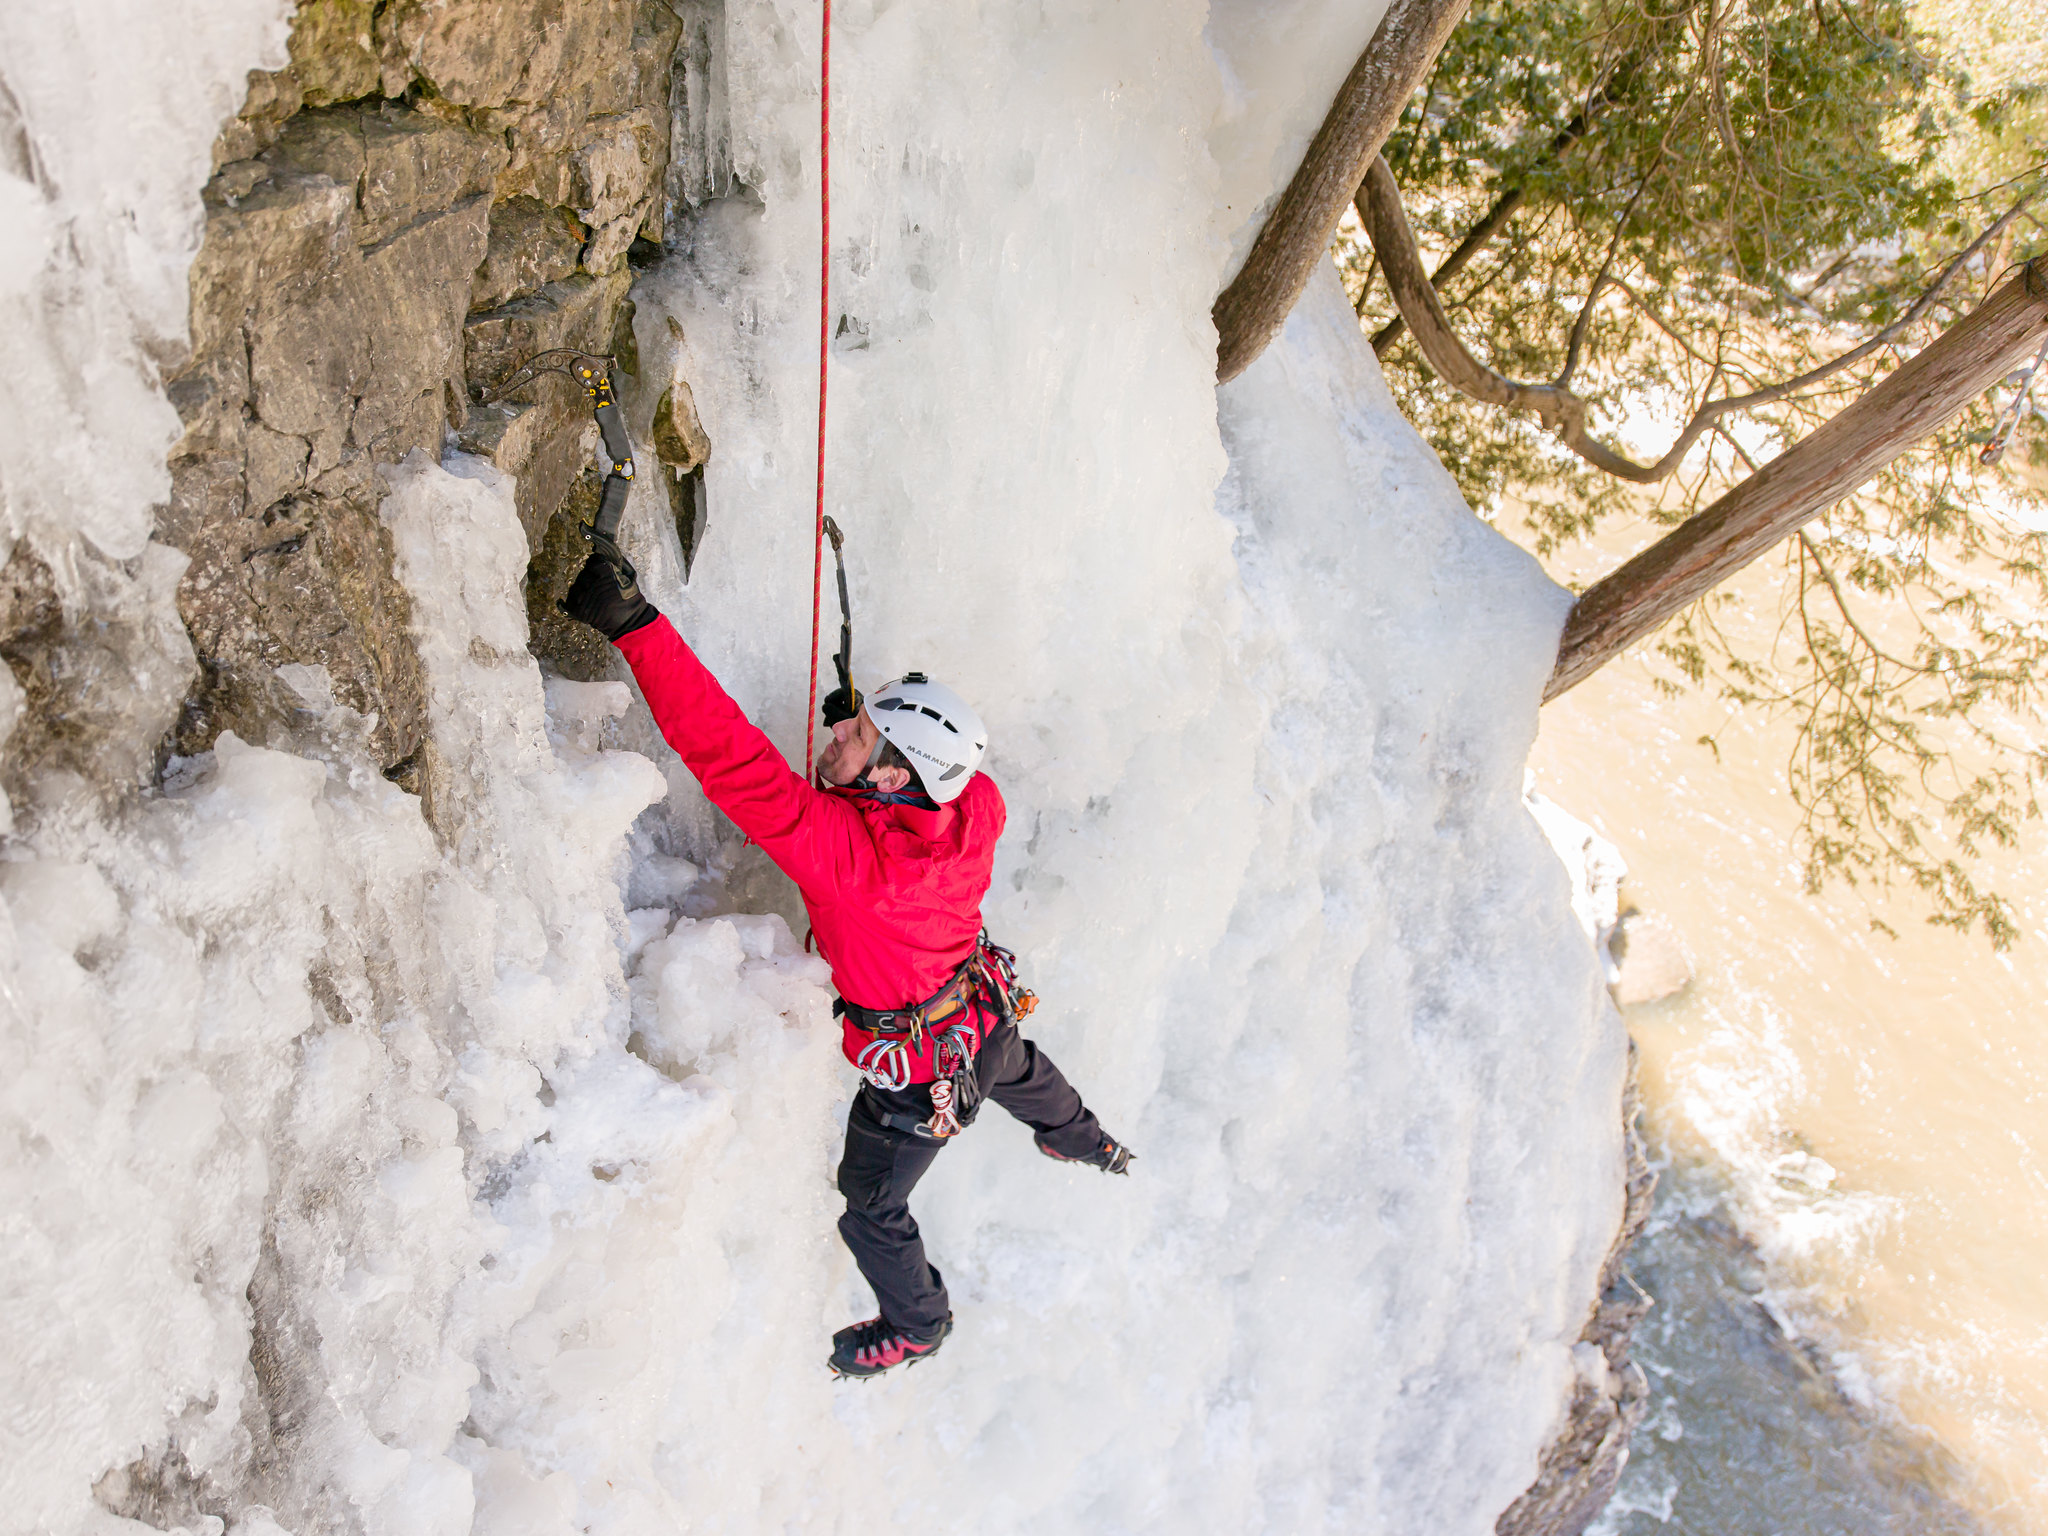
The bts post from @dchew got me inspired to get up to Lake Haiyaha, RMNP.
Well, it was my goal to get to Lake Haiyaha, but it was crazy windy and snowing. I took this series of pictures while I was waiting for the wind to die down, but it never did. At one point there was a white out so I turned around at Dream Lake.
Cambo WRS 1600 – APO Digitar 150 – Hasselblad CFV II 50c
3 shot stitch

Cambo WRS 1600 – APO Digitar 150 – Hasselblad CFV II 50c
3 shot stitch

Cambo WRS 1600 – APO Digitar 90 – Hasselblad CFV II 50c
Single Image

Almost forgot the bts picture:

Behind the scenes
6 days of bathrooms Cambo Wide, IQ150, Rodie 32 and 15'000 Watts of Broncolor flash power ...... Regards, Ben
www.getdpi.com
Well, it was my goal to get to Lake Haiyaha, but it was crazy windy and snowing. I took this series of pictures while I was waiting for the wind to die down, but it never did. At one point there was a white out so I turned around at Dream Lake.
Cambo WRS 1600 – APO Digitar 150 – Hasselblad CFV II 50c
3 shot stitch
Cambo WRS 1600 – APO Digitar 150 – Hasselblad CFV II 50c
3 shot stitch
Cambo WRS 1600 – APO Digitar 90 – Hasselblad CFV II 50c
Single Image
Almost forgot the bts picture:
Last edited:
diggles
Well-known member
Here's another one from the same hike, the snow was really starting to fall.
Cambo WRS 1600 – Rodenstock 50HR – Hasselblad CFV II 50c
1 Shot - 15mm Camera Fall + a couple degrees of swing to keep the tree on the right, center, and back left in focus.


You can see that the snow was starting to pile up on the camera so I was in a hurry. I wasn't sure that everything was going to be sharp, but luckily it was.
Cambo WRS 1600 – Rodenstock 50HR – Hasselblad CFV II 50c
1 Shot - 15mm Camera Fall + a couple degrees of swing to keep the tree on the right, center, and back left in focus.
You can see that the snow was starting to pile up on the camera so I was in a hurry. I wasn't sure that everything was going to be sharp, but luckily it was.
Last edited:
diggles
Well-known member
Thank you so much Rob! I was feeling a bit discouraged only coming home with a handful of pictures, but after spending some time with the files I liked how the weather made the scene quite different compared to what I've taken on other hikes.Super Warren! What a stunning landscape. The softness from the snow and the glow of the warm light is just delightful.
Greg Haag
Well-known member
Beautiful series Warren!Here's another one from the same hike, the snow was really starting to fall.
Cambo WRS 1600 – Rodenstock 50HR – Hasselblad CFV II 50c
1 Shot - 15mm Camera Fall + a couple degrees of swing to keep the tree on the right, center, and back left in focus.
View attachment 183341
View attachment 183342
You can see that the snow was starting to pile up on the camera so I was in a hurry. I wasn't sure that everything was going to be sharp, but luckily it was.
diggles
Well-known member
Thanks Dave! Yeah, you never know what it's going to be like until you get there…which is definitely part of the fun. Luckily the park is only about an hour away from home so I'll get another chance to try again soon!Hi Warren. Glad you went up there. I had similar weather on my first attempt to make it to Haiyaha for sunrise. Looks like a fun trip regardless.