The GetDPI Photography Forum

Great to see you here. Join our insightful photographic forum today and start tapping into a huge wealth of photographic knowledge. Completing our simple registration process will allow you to gain access to exclusive content, add your own topics and posts, share your work and connect with other members through your own private inbox! And don’t forget to say hi!

Behind the scenes

dchew

Well-known member
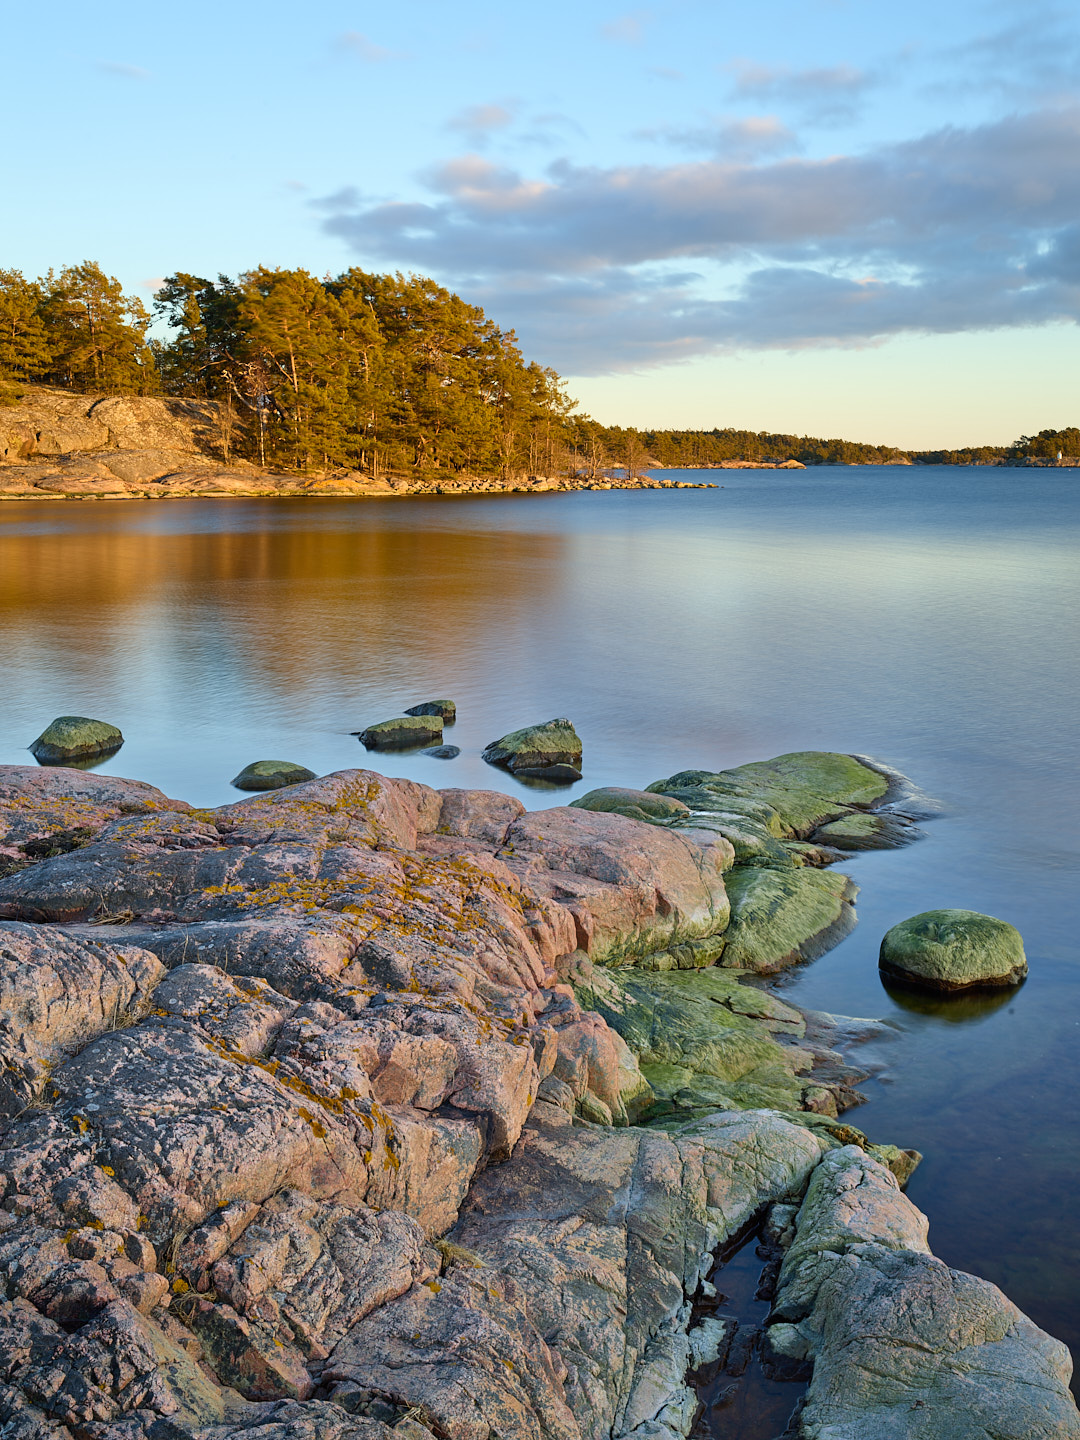
I was in Stockholm for work last week. Drove down to the coast on Sunday, just east of Nyköping. A place called Stendorren Nature Preserve with a wonderful island archipelago similar to the Georgian Bay in Ontario. The preserve has some good bridges across several islands, a lookout tower, and many great picnic areas. The rocks along the shore are what looks like granite with a nice pink color. Tide was on the way out, which also exposed the green plant life that covers what is frequently underwater.

Here was the first setup I had and the associated image. I am trying out a new smaller pack, the Deuter Freerider Pro 34+. I really like how small, light and comfy it is. The light weight doesn't come with many frills, but it has what I need: good suspension design, backpanel access and a few lid and front pockets. It fits an F-Stop small-pro ICU, but I don't think it would fit anything deeper like the Shimoda inserts or ThinkTank Stashmaster. The F-Stop depth fits pretty snug, with room around the four sides for other gear:


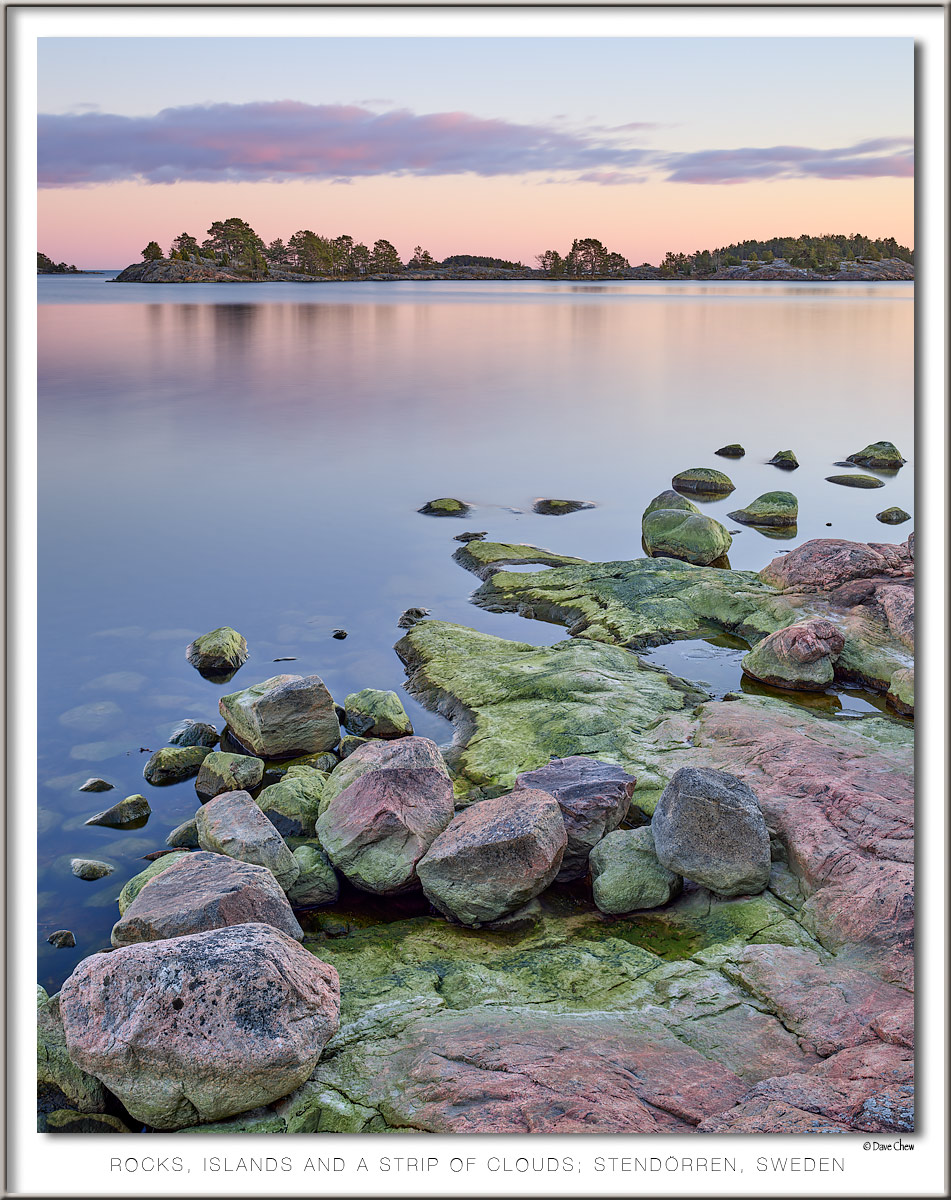
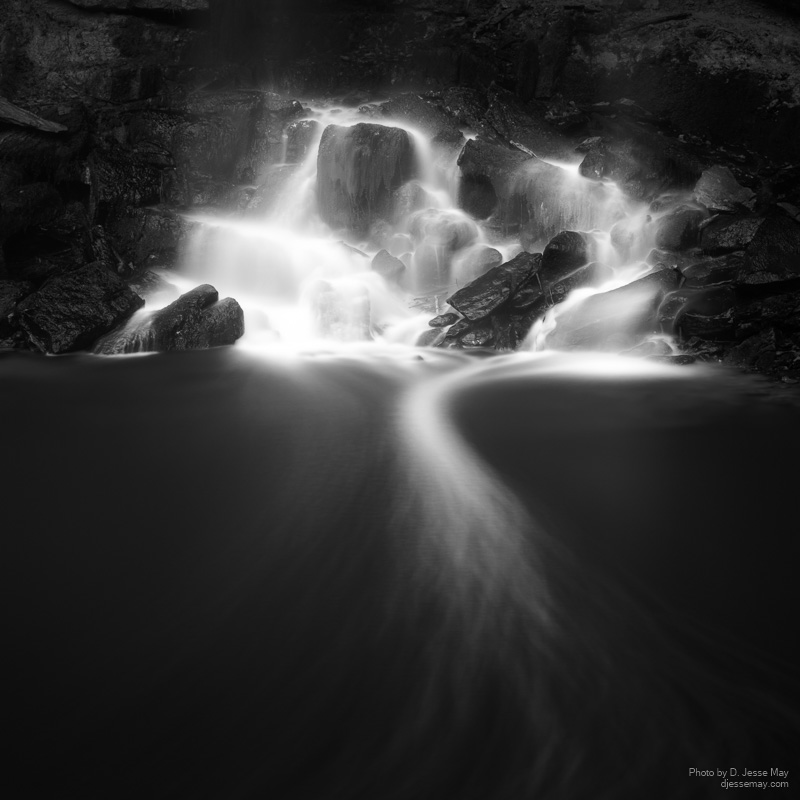
I moved around a bit to follow the clouds, and eventually settled on the image I posted in the technical camera thread:


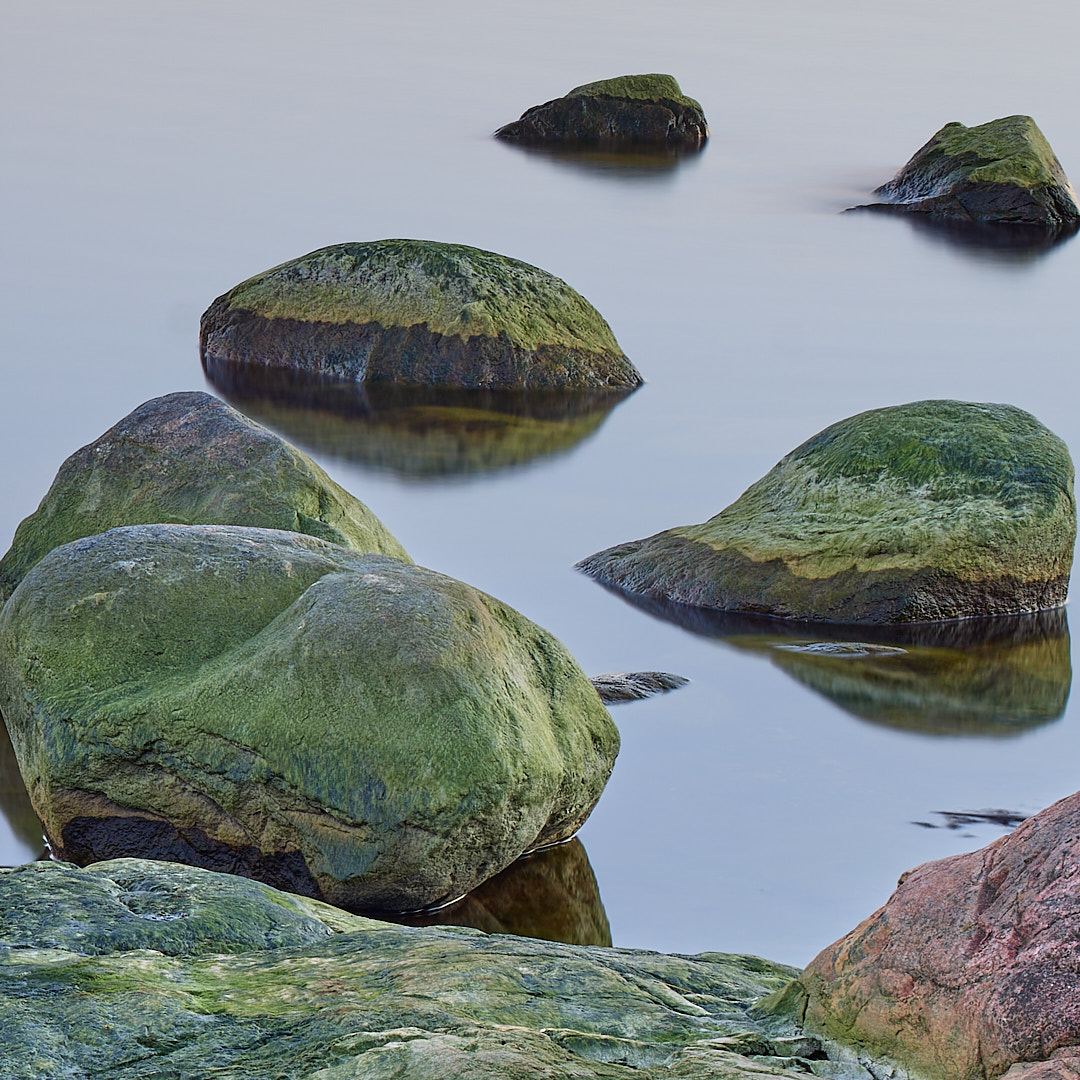
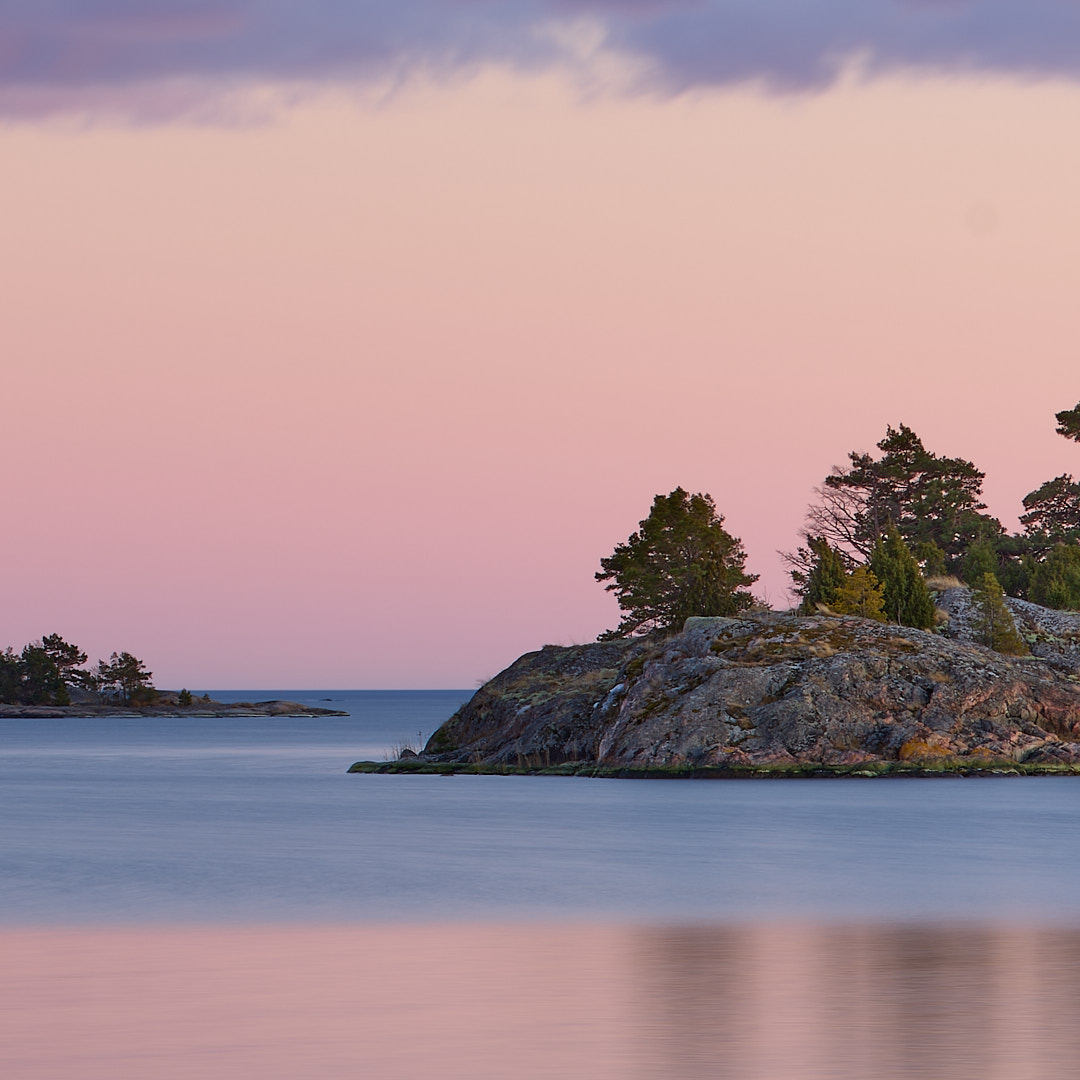
It was an obvious tilt opportunity. My standard process is to dial in one degree of tilt by default, open up the lens to f/5.6, focus midway and then adjust tilt until everything near and far comes into focus. Fine tune focus if necessary, and finally stop down to f/11. In this case, I had the camera angled down so only needed 1 to 1-1/2 degrees. Here are some 100% screenshots from bottom left, far rocks and distant island.

Dave


diggles

Well-known member
My standard process is to dial in one degree of tilt by default, open up the lens to f/5.6, focus midway and then adjust tilt until everything near and far comes into focus. Fine tune focus if necessary, and finally stop down to f/11. In this case, I had the camera angled down so only needed 1 to 1-1/2 degrees.
Hey Dave, great bit of insight here! I've been struggling with the best workflow for tilt and this sounds simple and quick. Question, when you are at f/5.6 and adjusting tilt until everything near and far comes into focus are you looking at focus peaking? Then do you fine tune if necessary at 100%?
 

dchew

Well-known member
Hey Dave, great bit of insight here! I've been struggling with the best workflow for tilt and this sounds simple and quick. Question, when you are at f/5.6 and adjusting tilt until everything near and far comes into focus are you looking at focus peaking? Then do you fine tune if necessary at 100%?
Hi Warren,
I do use focus peaking. If the whole scene is well lit so the back sees enough contrast it works fine. It would be nice if the whole scene lit up like a green Christmas Tree, but it usually doesn't. In this case, the rocks were just too dark. Usually it appears in small parts of the scene. When it appears in spots all over I know I am close. Maybe a blade of grass up front, one of the rocks and then trees in the distance. I then zoom into 100% at various places to see how everything looks. Zoomed in I will move focus a little. If the distant areas get sharper as I rotate focus farther out, I know I need more tilt. If they get sharper as I rotate focus closer in, I have too much tilt. Same with things up close but reversed. So in detail it goes like this:
  1. Open to f/5.6
  2. Dial in 1 degree of tilt.
  3. Zoom in to middle distance and focus.
  4. Zoom back out. If everything has peaking, then I'm done.
  5. If not, zoom in to a far distance and rotate the helical to a farther distance and rotate back. If things got sharper when doing that helical rotation test, add a little more tilt and try again. If things got more out of focus, use a little less tilt and try again.
  6. Then zoom in up front to see if everything is sharp. Usually at this point everything is really good. If not, I try again using the close focus point. For a close point, I dial focus closer and back out. If it got sharper, I add more tilt. If not, less tilt.
  7. I don't expect everything to be tack sharp because I'm still at f/5.6. But it should be uniform throughout the image.
  8. Close down to f/11 or f/12, adjust shutter speed and shoot.
Sometimes I do the helical rotation up front first, it just depends on where things are in the frame. The tricky thing with tilt is that as you dial in more tilt, the DoF wedge gets narrower. In this case, I had the whole camera tilted forward. So even though the camera was pretty close to the ground I didn't need too much tilt. The less tilt you need the easier it is. @Greg Haag started a post a while back about tilt and there is a lot of info there. Can't seem to find it right now [edit - here it is]. On an Alpa, 1 degree is about 1.5 rotations of the dial. I have a white mark on the dial so I can keep track of where it is. The adapter has degree marks, but they are hard to see in the dark.

Dave
 
Last edited:

Greg Haag

Well-known member
Hi Warren,
I do use focus peaking. If the whole scene is well lit so the back sees enough contrast it works fine. It would be nice if the whole scene lit up like a green Christmas Tree, but it usually doesn't. In this case, the rocks were just too dark. Usually it appears in small parts of the scene. When it appears in spots all over I know I am close. Maybe a blade of grass up front, one of the rocks and then trees in the distance. I then zoom into 100% at various places to see how everything looks. Zoomed in I will move focus a little. If the distant areas get sharper as I rotate focus farther out, I know I need more tilt. If they get sharper as I rotate focus closer in, I have too much tilt. Same with things up close but reversed. So in detail it goes like this:
  1. Open to f/5.6
  2. Dial in 1 degree of tilt.
  3. Zoom in to middle distance and focus.
  4. Zoom back out. If everything has peaking, then I'm done.
  5. If not, zoom in to a far distance and rotate the helical to a farther distance and rotate back. If things got sharper when doing that helical rotation test, add a little more tilt and try again. If things got more out of focus, use a little less tilt and try again.
  6. Then zoom in up front to see if everything is sharp. Usually at this point everything is really good. If not, I try again using the close focus point. For a close point, I dial focus closer and back out. If it got sharper, I add more tilt. If not, less tilt.
  7. I don't expect everything to be tack sharp because I'm still at f/5.6. But it should be uniform throughout the image.
  8. Close down to f/11 or f/12, adjust shutter speed and shoot.
Sometimes I the the helical rotation up front first, it just depends on where things are in the frame. The tricky thing with tilt is that as you dial in more tilt, the DoF wedge gets narrower. In this case, I had the whole camera tilted forward. So even though the camera was pretty close to the ground I didn't need too much tilt. The less tilt you need the easier it is. @Greg Haag started a post a while back about tilt and there is a lot of info there. Can't seem to find it right now [edit - here it is]. On an Alpa, 1 degree is about 1.5 rotations of the dial. I have a white mark on the dial so I can keep track of where it is. The adapter has degree marks, but they are hard to see in the dark.

Dave
I believe this is the post Dave is referring to, so much great info in it!


diggles

Well-known member
Hi Warren,
I do use focus peaking. If the whole scene is well lit so the back sees enough contrast it works fine. It would be nice if the whole scene lit up like a green Christmas Tree, but it usually doesn't. In this case, the rocks were just too dark. Usually it appears in small parts of the scene. When it appears in spots all over I know I am close. Maybe a blade of grass up front, one of the rocks and then trees in the distance. I then zoom into 100% at various places to see how everything looks. Zoomed in I will move focus a little. If the distant areas get sharper as I rotate focus farther out, I know I need more tilt. If they get sharper as I rotate focus closer in, I have too much tilt. Same with things up close but reversed. So in detail it goes like this:
  1. Open to f/5.6
  2. Dial in 1 degree of tilt.
  3. Zoom in to middle distance and focus.
  4. Zoom back out. If everything has peaking, then I'm done.
  5. If not, zoom in to a far distance and rotate the helical to a farther distance and rotate back. If things got sharper when doing that helical rotation test, add a little more tilt and try again. If things got more out of focus, use a little less tilt and try again.
  6. Then zoom in up front to see if everything is sharp. Usually at this point everything is really good. If not, I try again using the close focus point. For a close point, I dial focus closer and back out. If it got sharper, I add more tilt. If not, less tilt.
  7. I don't expect everything to be tack sharp because I'm still at f/5.6. But it should be uniform throughout the image.
  8. Close down to f/11 or f/12, adjust shutter speed and shoot.
Sometimes I the the helical rotation up front first, it just depends on where things are in the frame. The tricky thing with tilt is that as you dial in more tilt, the DoF wedge gets narrower. In this case, I had the whole camera tilted forward. So even though the camera was pretty close to the ground I didn't need too much tilt. The less tilt you need the easier it is. @Greg Haag started a post a while back about tilt and there is a lot of info there. Can't seem to find it right now [edit - here it is]. On an Alpa, 1 degree is about 1.5 rotations of the dial. I have a white mark on the dial so I can keep track of where it is. The adapter has degree marks, but they are hard to see in the dark.

Dave
This helps a lot Dave! I've had success with tilt, but haven't done it enough to figure out a systematic approach. Now I need to absorb this, read @Greg Haag thread and practice!
 

Greg Haag

Well-known member
This was more about looking for an excuse to test the MacBook Air for tethering and this Daffodil just beginning to bloom was handy. I have found as I am getting older it has become harder to nail focus looking at my digital back, for now the MacBook Air is what I have settled on.

IQ4 150 Cambo 1600 Rodenstock 90mm
flower small bts.jpg
Daffodils.jpg
 

bab

Active member
Thought I would go down to a favorite spot for some fresh air and a sunset, the opportunity of a sunset with clouds is this area is not often this time of year the chances are greater though.
I've started only carrying two lenses ( one 50mm and the 100mm ) tripod and camera with a few filters its a pleasure. Noted rawdigger shows no matter how careful I expose ETTR the Hasselblad histogram is a minimum of 2/3 stop underexposed for the highlights (except for the actual solar spot). One day Im going to figure out how much I can slam it up the wall before the chanels actually clip.
Photos without rocks using 50mm f/3.5 glass @ f/16, ISO200, Photos with rocks is the 50mm f/3.5 @ f/18, ISO64...I been using a reverse ND150 x170mm from NISI on my 28mm which on the smaller diameter lenses is overkill so getting this smaller 100x150mm from K&F concept it seems to work just fine.
My post processing is from Phocus into PS then using some luminosity masks from TK, Lumenzia and in the final pull for micro contrast topaz studio 2.
 

Attachments

Digitalcameraman

Active member
The Racetrack Playa at Death Valley National Park features rocks that move across the cracked desert floor leaving long trails.

Phase One XT IQ4 150 w/ Rodenstock 32mm HR
1/4
F/10
ISO 64
#Racetrack #DeathValley #Captureintegration #phaseone #PhaseoneXT #IQ4150
#mediumformatexpert #mediumformatexperience #chrissnipes

XT at Racetrack.jpg

Racetrack XT 32mm getdpi.jpg
 

GeorgeBo

Well-known member
Due to the temptations that this forum presents :) and with the great customer service from Capture Integration, I bit the bullet and purchased a CFV II 50C. I have been testing it at the house the last week and finally got a break at work and weather today and decided to take it along with my Cambo Actus on a in Navy terms "shakedown cruise". I thought I would give a behind the scenes of that effort.

I loaded up my backpack with the kitchen sink and did a 5 mile out and back hike along a local river. Goal was to just use the gear in different shooting scenarios and get the feel for the camera before going on a serious trip.

My set up for carrying is a converted Kelty Raven 2600 backpack that I was able to use the inserts from a Pelican case that I had. I added a dump pouch to the molle webbing to hold the weight of the tripod. Works out quite well and distributes the weight nicely. As you can see in the shot of the pack open, I have big room for improvement on my organization. :)

The tethering of the iPad was perfect and it is great having a 10" viewfinder. Definitely worth the weight penalty of carrying it in the field.

The other plus of today's trip, is I verified that my copal shutters are accurate. Now to research wide angle options for using on the Cambo. Any input on that would be appreciated. Widest lens I have now to use on the Cambo is 65mm. I could adapt a Pentax A 645 35mm I have, but not sure how much movement that will allow.

Thanks for looking,

George

B9678465-1.jpgIMG_3388.jpgIMG_3389.jpgIMG_3393.jpgIMG_3392.jpg
 

Greg Haag

Well-known member
Due to the temptations that this forum presents :) and with the great customer service from Capture Integration, I bit the bullet and purchased a CFV II 50C. I have been testing it at the house the last week and finally got a break at work and weather today and decided to take it along with my Cambo Actus on a in Navy terms "shakedown cruise". I thought I would give a behind the scenes of that effort.

I loaded up my backpack with the kitchen sink and did a 5 mile out and back hike along a local river. Goal was to just use the gear in different shooting scenarios and get the feel for the camera before going on a serious trip.

My set up for carrying is a converted Kelty Raven 2600 backpack that I was able to use the inserts from a Pelican case that I had. I added a dump pouch to the molle webbing to hold the weight of the tripod. Works out quite well and distributes the weight nicely. As you can see in the shot of the pack open, I have big room for improvement on my organization. :)

The tethering of the iPad was perfect and it is great having a 10" viewfinder. Definitely worth the weight penalty of carrying it in the field.

The other plus of today's trip, is I verified that my copal shutters are accurate. Now to research wide angle options for using on the Cambo. Any input on that would be appreciated. Widest lens I have now to use on the Cambo is 65mm. I could adapt a Pentax A 645 35mm I have, but not sure how much movement that will allow.

Thanks for looking,

George

View attachment 193304View attachment 193305View attachment 193306View attachment 193307View attachment 193309
Awesome behind the scenes George, I look forward to seeing more! My wide on the Cambo 1600 is 32 mm, it is a great lens, but if I were doing it again today I might also consider the 40 for size and weight.
 

diggles

Well-known member
Now to research wide angle options for using on the Cambo. Any input on that would be appreciated. Widest lens I have now to use on the Cambo is 65mm. I could adapt a Pentax A 645 35mm I have, but not sure how much movement that will allow.
Congratulations on the purchase! It is a fine back and a lot of fun to use. You're off to a great start with a very nice image!

I've used a number of different wide lenses with the Cambo Actus / CFVii 50c combo. Pentax, Rodenstock, and Canon.

My favorite in terms of quality and usable image circle is the 32HR, but like @Greg Haag said it is a big/heavy lens. Currently, I'm not using the Actus, but I am using the WRS1600 with the Hasselblad. I've also sold my copy of the 32HR and picked up a Schneider 35XL to replace it. The 35XL comes up on the used market fairly frequently and you can find it for about 1/2 to 1/3 the price of the 32HR.

Here is my experience comparing the 35XL to the 32HR. With the 35XL a Center Filter is very important, especially with the CFVii 50c because of the sensor it uses. The 32HR doesn't require one, but the files are noticeable cleaner if you use one. At f/11 without any movements, the 35XL will give you very similar results on the Hasselblad back compared to the 32HR. If you go past 10mm of movement with the Hasselblad 44x33mm sensor then the 32HR starts to leave the 35XL behind in terms of sharpness in the corners. On a Phase One 53.4x40mm sensor then you'll see noticeable difference in the corners with anything greater than 5mm of shift.

I've also used the Pentax A and the HD 645 35mm. Nice lenses that offer a good amount of movement, probably more than the Schneider 35XL, but not as good as the 32HR or the Schneider 35XL in terms of sharpness and clarity.
 

GeorgeBo

Well-known member
Congratulations on the purchase! It is a fine back and a lot of fun to use. You're off to a great start with a very nice image!

I've used a number of different wide lenses with the Cambo Actus / CFVii 50c combo. Pentax, Rodenstock, and Canon.

My favorite in terms of quality and usable image circle is the 32HR, but like @Greg Haag said it is a big/heavy lens. Currently, I'm not using the Actus, but I am using the WRS1600 with the Hasselblad. I've also sold my copy of the 32HR and picked up a Schneider 35XL to replace it. The 35XL comes up on the used market fairly frequently and you can find it for about 1/2 to 1/3 the price of the 32HR.

Here is my experience comparing the 35XL to the 32HR. With the 35XL a Center Filter is very important, especially with the CFVii 50c because of the sensor it uses. The 32HR doesn't require one, but the files are noticeable cleaner if you use one. At f/11 without any movements, the 35XL will give you very similar results on the Hasselblad back compared to the 32HR. If you go past 10mm of movement with the Hasselblad 44x33mm sensor then the 32HR starts to leave the 35XL behind in terms of sharpness in the corners. On a Phase One 53.4x40mm sensor then you'll see noticeable difference in the corners with anything greater than 5mm of shift.

I've also used the Pentax A and the HD 645 35mm. Nice lenses that offer a good amount of movement, probably more than the Schneider 35XL, but not as good as the 32HR or the Schneider 35XL in terms of sharpness and clarity.
Thanks so much for the detailed reply! I will definitely read up on the 35XL and 32HR. In the mean time I will put the Pentax A 645 35mm to use. I do have a lensplate for that mount so best to see if that focal length is what I am after.

Edit: Checks price of 32HR... Yep that Pentax A 35mm 645 is going to work out just fine 😄
 
Last edited:
Top