For those crazy enough to still want to do this, here is a ridiculously long post about the process since we no longer have the videos on the internet. I'm no videographer, so you will have to deal with my text and images.
As Victor points out, you can ignore the HPF rings and just be sure infinity is in focus if you plan to always use Live View. I don't have a location near by with a clear infinity shot, so I do this indoors where I can tether and the environment is controlled. Based on my visit to Alpa, they don't test at infinity either; they have a set up in their office with a maximum distance of ~15 feet.
The process I've outlined below assumes you already have the HPF rings installed.
Anyway, here it goes…
What you will need:
- All your lenses
- HPF Rings (optional)
- Suitable target: A ruler or other device helps to know the precise plane of focus; I use LensAlign from Michael Tapes Design
- Tape measure or Laser distance meter. The laser makes it much easier to accurately measure the distance
- Loupe (optional)
- Tethered computer (optional)
- Alpa shim kit
- #0 Phillips head screwdriver
- #2 Hex tool for HPF ring
The Process:
Set up the target so you can accurately determine the plane of focus (PoF). Not so close that you drive yourself crazy but close enough to tell the difference between one degree / tick mark on the HPF ring. Approximately 1/3 in from infinity on the focus scale works well for me.
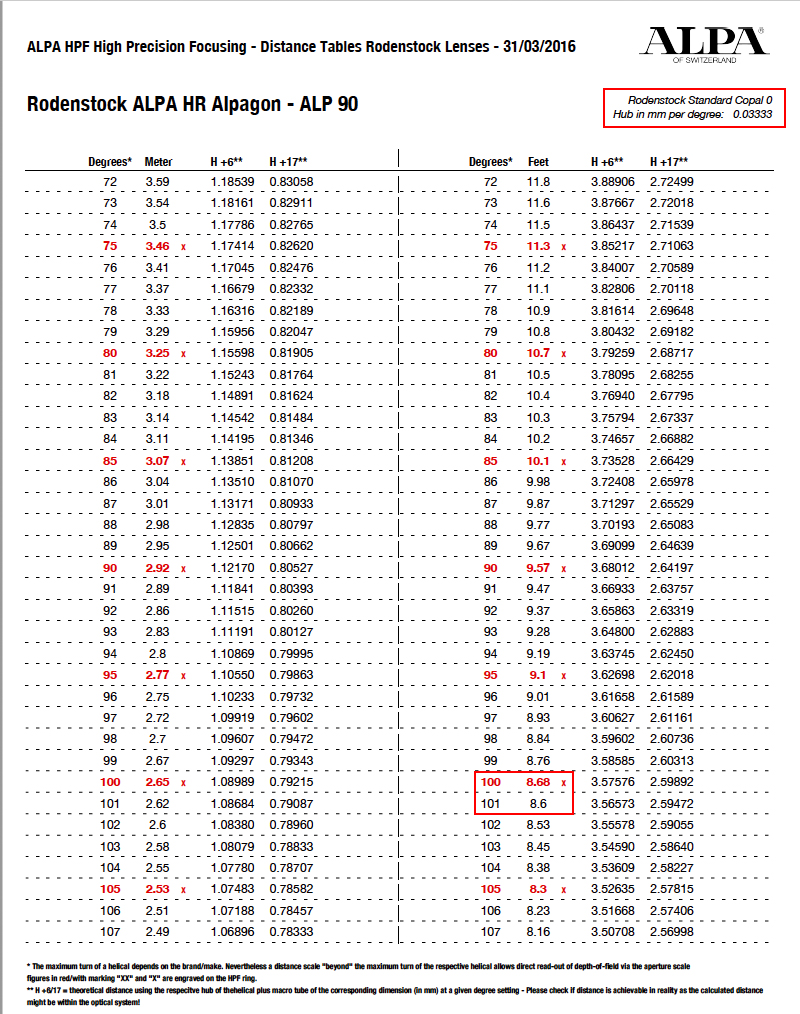
Measure your distance. If you have adapters between the camera and your sensor then make sure you are measuring to the right point. You want to be at the sensor plane. I've measured the distance from the camera back to the sensor face; near as I can tell it is about 1/4", 0.02 feet, or about 6 mm. Not enough to worry about, but if you want to add that to your distance readings, have at it! To make life easier later, I measure and set the distance so it matches one of the degree points on the HPF ring. For example, the 90hrsw has a point at 8.60 ft. I set the distance exactly to 8.60 feet (8.58 +0.02 = 8.60).

Using live view (or tethered) with the lens f-stop wide open, dial the HPF ring to the right point (in this case 8.6ft), take the photo and see where the focus point is. I find it easier to be a little underexposed so the target is clear and sharp. Zoom in and see if you are accurately focused. It helps to look at the out of focus areas in front and behind the PoF on the ruler to compare how fuzzy they are. For example, the blurriness 1" in front of the PoF should be the same as 1" behind the PoF. On a retina or 4k display I find it easier to view at 200%. See sample images below.
It might be tough to see in the jpeg, but the "22" in front of the target is more out of focus than the "22" behind the target, so I think I am a little behind the target. This lens is back focused vs the HPF ring.
In my example I have to dial the focus in a little. Adjust focus and shoot again as necessary until you get dead on focus. Second try is much better:
Here is a direct comparison between the first and second attempt:
Compare the real distance to the HPF mark you are at when in focus. Write down how far off you are and in which direction. The major lines labeled with distance are 5 degrees apart; minor lines in between are 1 degree apart. It is the number of tick marks (degrees) off that matters, not the actual distance in feet or meters. Depending on how accurate you want to be, you could note the error in full degrees, 1/2 degrees or 1/3 degrees. 1/3 degrees makes some sense since 1/3 of a degree is roughly equal to a 0.01mm shim. But if it drives you crazy trying to see and judge that close, just use whole tick marks and remember that 1 tick mark off represents about a 0.03 shim.
Defocus and repeat. Seriously; stop complaining and just do it again. If you get a different result, do it again until you get repeatable results.
Get a beer, refocus your eyes and do the same thing with your second lens (if you have more than four lenses you might want to pace yourself with the beer). :chug:
After you've gone through all your lenses, look at your notes and find the lens that was front focused the most. In other words, the lens you had to dial out the farthest to get in focus vs where it should have been based on the HPF focus scale. Again, you care about degrees off (number of tick marks), not the actual distance. This is the lens you want to shim to. This gets confusing, so here is an example: Lets say you have the following results:
- 40hr: At 6.37 feet target distance, the lens is not in focus at 6.37 on the HPF ring. It has to be dialed in one degree to 6.17 feet on the HPF ring to be in focus. This lens is back focused, meaning the PoF is behind where it should be according to the distance scale on the lens (HPF ring).
- 70hr: At 7.43 feet target distance, the lens is in focus when the HPF ring is 1-1/3 degrees behind the 7.43 mark on the HPF ring, between 69 degrees (7.53 ft) and 68 degrees (7.63 feet). This lens is front focused, meaning the PoF is in front of where it should be according to the distance scale on the lens. You have to turn the helical beyond 7.43ft in order to align the PoF with the target.
- 90 hr: At 8.6 feet target distance, the lens focuses exactly at the 8.6 mark on the HPF ring.
In this example the 70hr front focuses the most, so we will shim to that lens. If you think about it, a lens that focuses in front of where it supposed to will not focus at infinity. In order to focus at infinity, we would have to turn the helical beyond its hard stop at infinity. We can’t have that!
Do some basic math with degrees on the HPF ring. Using the above example, 1-1/3 degrees equals 0.04mm of shim space (1.33 x 0.03mm/degree). Here comes the toughest part of this whole process: figuring out if that means you REMOVE 0.04mm or ADD 0.04mm!! Every time I do this I have to think it through 10 times. Trust me: it means you have to REMOVE the equivalent 0.04mm of shim space. Actually, you shouldn't trust me… but I'm pretty sure that is correct. If all your lenses back focus, then pick the lens that back focuses the
least. In that case you will be ADDING shims in order to get that lens to focus correctly.
Grab the shim kit, remove the DB adapter and remove the four screws on the adapter. Take inventory of what shims you already have in there. This can be tricky, but if you compare each one to the spares you have in the marked bags you can tell pretty well; they will wiggle and flex in the same way. DON'T MIX UP THE SHIMS IN THE BAGS. Only take one out at a time. You will thank me later.
In order to remove the equivalent of 0.04mm, we could remove 0.05mm and add a 0.01mm. You will have to see what is already in there, then add / subtract shims to get where you need to be.
It should not matter what order the shims are placed, but I like to have thicker shims at the top and bottom of the stack so the thin shims don't get damaged.
Reassemble and shoot with that lens again. Make sure you are dead on the PoF. If not, make any necessary adjustments.
If you are always going to use Live View, then you are done. All your lenses will focus at or beyond infinity. You can even remove all your HPF rings, find someone with a CCD digital back and sell them to him or her for a gazillion dollars.

If you still want to use the HPF rings, then you need to go back to your other lenses to see how far off they are now that the back is re-shimmed. In our example, the 90hr was perfect before, but now should be focusing 1-1/3 degrees back. Loosen the HPF ring and rotate it 1-1/3 degrees (tick marks) beyond the infinity mark. When looking at the front of the lens, you want to rotate the HPF ring clockwise 1-1/3 degrees so that the infinity stop on the lens is 1-1/3 degrees beyond the infinity mark on the HPF ring. This can be a little maddening; you can't use the lens's infinity mark as a reference because the HPF ring has no markings beyond infinity to gauge to. I just pick a different reference point somewhere else on the lens distance scale. Note where it lines up and how far 1-1/3 degrees is, then rotate as needed.
My sk60XL is an example. It focuses behind my 90hrsw. Here the lens is focused at infinity with the HPF ring rotated a few degrees:
You can't see the factory lens scale, but in the photo below the lens is focused all the way to its hard stop. The HPF ring reads beyond infinity. If you want to focus at infinity in the field, you will focus to the infinity mark on the HPF ring like the photo above, NOT the hard stop on the lens helical:
Jeeze. If you got this far I hope it helped.
Dave