gcap
Well-known member
Wishing for movements especially with tele lenses in order to maximize depth of field began a quest for a GX680 system with the intent to mount my P45 Phase One back. Searching around for info about that combo I was disappointed since the only feasible way to use such a combo was via the Kapture Group adapter which is cumbersome and scarce these days. Only ray of light was a message found stating that someone in Germany was able to correct the signal from the PC port in order for it to represent the correct exposure made and not a 1/15 sec that is the default.
This information pushed me forward with the investment and after some looking around at the auction site one fitting my budget was available. 430 Euros and a few days of shipping latter and I am the owner of a ver. II body with 2 lenses (80 and 150). An adapter was ordered from China and some other accessories and additional lenses (reflex finder, wide angle bellows, 250mm and 65mm).
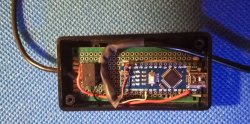
In the meantime had vigorous discussions with a colleague with vast experience with electronics and a solution began forming: use of an arduino nano board (to get the signal from camera to lens and program through its USB port) and a simple switch (to wake up the back and time the exposure). The problem now was to find out where to get the signal from and how to time the back exposure. After some experiments found which connection had the signal from the body, the power and ground. Since arduino is programmable we could make changes in timings just by editing the appropriate code. An attempt to get the signal from the flexible cable between camera and lens board failed since there was not enough room for the camera to focus at infinity afterwards.
The final solution was more elegant as a cable came out from the same exit as the cable connecting the right side of the mounting board with the lens pins on the other side. The arduino and the switch where placed in a small plastic box and a female PC with cable was connected with the switch. The box was placed just under the battery compartment on the left side of the camera using adhesive Velcro and a Phase one connector completed the construction.

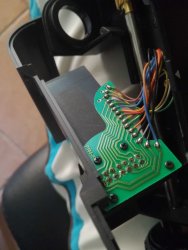
The board before the intervention. All cables leaving end up outside and then back inside to the lens pins:

Some testing with the back and the newly arrived adapter corrected the timing and finally the combo was working consistently on all speeds with the mirror up or down without errors from the back. Only 40ms are needed for the back to wake up and make an exposure so the problem of overheating the sensor due to long waits was eliminated. Unfortunately this created the only drawback of the solution i.e. faster shutter speeds (1/125 and above) became shorter as some of the exposure is “eaten” from the wake up delay. This is not a concern of mine since my intention as stated is to use the camera in order to maximize depth of field and slower speeds are the norm. I haven’t tested flash synchronization which could be affected by the delay but again not a concern of mine. I get some errors sometimes, especially when the back is inactive for a while but strangely enough most of the time the pics come out fine.
Finally a simple frame was drawn on a clear sheet with the dimensions of the sensor and placed on the focusing screen to mark the frame both in horizontal and vertical.
In the Field
It goes without saying that the camera is HUGE and heavy! You have to be very careful placing it on the tripod and moving it around on it. Being so heavy is so easy for the tripod to tip over when not leveled. For some reason the camera is front heavy, the tripod thread should have been closer to the front even with the digital back which is heavier than the film back. I bought a larger plate (not yet in my hands) with loops in order to place a small strap so I can hold it from when moving from tripod to the bag and vice versa.
I have placed the body with lens and the digital back on a Lowepro Nova 4 old bag and 2 lenses on a Lowepro lens case 4 the one on top of the other. Considering length and area covered and in great contrast with the body the lenses are quite small and the strange rectangular mount doesn’t allow the lens to roll even when placed on their side. Placing body and lenses separately makes for a quite compact setup considering actual size.
When the camera is on the tripod it is a joy to use. The lens controls are very easy to master and after a few minutes I was able to make corrections without taking my eye from the finder. Corrections with the 65 are tougher to get as usually are very near 0 and easily click there. Speaking of the finder, it’s reasonably bright (for a mirror finder) but you have to have your eye exactly in the middle of the pupil or else part of the frame darkens. In my first attempts some of the pics were out of focus mainly on the tilted part but this was certainly my fault as in the next day I had 100% success with focus by being more careful.
I prefer to focus on the nearest part of the frame and then tilt in order for the lens board to be as far as possible from the body so corrections are easier (more space). This is more important with wide angle lenses as the distance of the lens frame is quite small even in relatively close distances. After all since the plane of focus is a cone with its top near the camera it is most important for that part to be precisely in focus.
Samples here: https://www.getdpi.com/forum/medium...4730-fun-mf-images-post762511.html#post762511
Sorry for the long post.
This information pushed me forward with the investment and after some looking around at the auction site one fitting my budget was available. 430 Euros and a few days of shipping latter and I am the owner of a ver. II body with 2 lenses (80 and 150). An adapter was ordered from China and some other accessories and additional lenses (reflex finder, wide angle bellows, 250mm and 65mm).
In the meantime had vigorous discussions with a colleague with vast experience with electronics and a solution began forming: use of an arduino nano board (to get the signal from camera to lens and program through its USB port) and a simple switch (to wake up the back and time the exposure). The problem now was to find out where to get the signal from and how to time the back exposure. After some experiments found which connection had the signal from the body, the power and ground. Since arduino is programmable we could make changes in timings just by editing the appropriate code. An attempt to get the signal from the flexible cable between camera and lens board failed since there was not enough room for the camera to focus at infinity afterwards.
The final solution was more elegant as a cable came out from the same exit as the cable connecting the right side of the mounting board with the lens pins on the other side. The arduino and the switch where placed in a small plastic box and a female PC with cable was connected with the switch. The box was placed just under the battery compartment on the left side of the camera using adhesive Velcro and a Phase one connector completed the construction.

The board before the intervention. All cables leaving end up outside and then back inside to the lens pins:

Some testing with the back and the newly arrived adapter corrected the timing and finally the combo was working consistently on all speeds with the mirror up or down without errors from the back. Only 40ms are needed for the back to wake up and make an exposure so the problem of overheating the sensor due to long waits was eliminated. Unfortunately this created the only drawback of the solution i.e. faster shutter speeds (1/125 and above) became shorter as some of the exposure is “eaten” from the wake up delay. This is not a concern of mine since my intention as stated is to use the camera in order to maximize depth of field and slower speeds are the norm. I haven’t tested flash synchronization which could be affected by the delay but again not a concern of mine. I get some errors sometimes, especially when the back is inactive for a while but strangely enough most of the time the pics come out fine.
Finally a simple frame was drawn on a clear sheet with the dimensions of the sensor and placed on the focusing screen to mark the frame both in horizontal and vertical.
In the Field
It goes without saying that the camera is HUGE and heavy! You have to be very careful placing it on the tripod and moving it around on it. Being so heavy is so easy for the tripod to tip over when not leveled. For some reason the camera is front heavy, the tripod thread should have been closer to the front even with the digital back which is heavier than the film back. I bought a larger plate (not yet in my hands) with loops in order to place a small strap so I can hold it from when moving from tripod to the bag and vice versa.
I have placed the body with lens and the digital back on a Lowepro Nova 4 old bag and 2 lenses on a Lowepro lens case 4 the one on top of the other. Considering length and area covered and in great contrast with the body the lenses are quite small and the strange rectangular mount doesn’t allow the lens to roll even when placed on their side. Placing body and lenses separately makes for a quite compact setup considering actual size.
When the camera is on the tripod it is a joy to use. The lens controls are very easy to master and after a few minutes I was able to make corrections without taking my eye from the finder. Corrections with the 65 are tougher to get as usually are very near 0 and easily click there. Speaking of the finder, it’s reasonably bright (for a mirror finder) but you have to have your eye exactly in the middle of the pupil or else part of the frame darkens. In my first attempts some of the pics were out of focus mainly on the tilted part but this was certainly my fault as in the next day I had 100% success with focus by being more careful.
I prefer to focus on the nearest part of the frame and then tilt in order for the lens board to be as far as possible from the body so corrections are easier (more space). This is more important with wide angle lenses as the distance of the lens frame is quite small even in relatively close distances. After all since the plane of focus is a cone with its top near the camera it is most important for that part to be precisely in focus.
Samples here: https://www.getdpi.com/forum/medium...4730-fun-mf-images-post762511.html#post762511
Sorry for the long post.
