carstenw
Active member
Okay, I am awake again. Here is my current approach (probably not optimal), which I have gleaned primarily from Samuli Vahonen and denoir over on FM. Basically, there are two steps, which are done alternatingly until the correct size is reached. I use Photoshop CS4, but other programs might work as well. I am not aware of any way to do this in Lightroom or Aperture, however.
0) process image for colour and everything else
1) sharpen
2) resize
3) if final size has not been reached, go to 1)
4) add frame
For sharpening, I use three tools: "Sharpen", "Unsharp Mask" (120/0.5/5) and "Smart Sharpen" (Basic/120/0.2/Gaussian Blur), and I view some detailed area of the image at full size, i.e. 100% (Cmd+1). I start by trying "Sharpen". If that is too much sharpening, I undo it and do "Unsharp Mask". If that is too much sharpening, I undo it and try "Smart Sharpen". The latter is so gentle that I sometimes need to apply it more than once to see any difference. Once I have stepped from "Sharpen" to "Unsharp Mask", I don't go back in the next steps. Once I have gone from "Unsharp Mask" to "Smart Sharpen", I don't go back in the next steps. In other words, I start with the largest changes, and progressively move to gentler sharpening until done.
The important thing while sharpening is to avoid over-sharpening. It can be hard to detect, but generally, the "Sharpen" and "Unsharp Mask" steps have a tendency to brighten edges, and if you see that, you have gone too far. The problem is that edges brightened in an intermediate step will tend to mix with darker regions and make the photo muddy, once resized.
I have tried various single-step algorithms, but have not yet found a way to get as much nice detail as with this method. Once you get used to it, it takes only a minute or so per photo. It seems like a bit of overhead, but compared to earlier, where I used to post more images of generally lower quality, I now post fewer, better images, and this fits in well with that.
The resize step is just the standard Bicubic, and I normally resize 61%, 64%, 68% or 74% in each step. I try to avoid even divisions (0.5, 0.66, ..) since that would tend to promote artifacts. The resampling which is forced by using an uneven size acts like a gentle AA filter, and is counter-balanced by the sharpening.
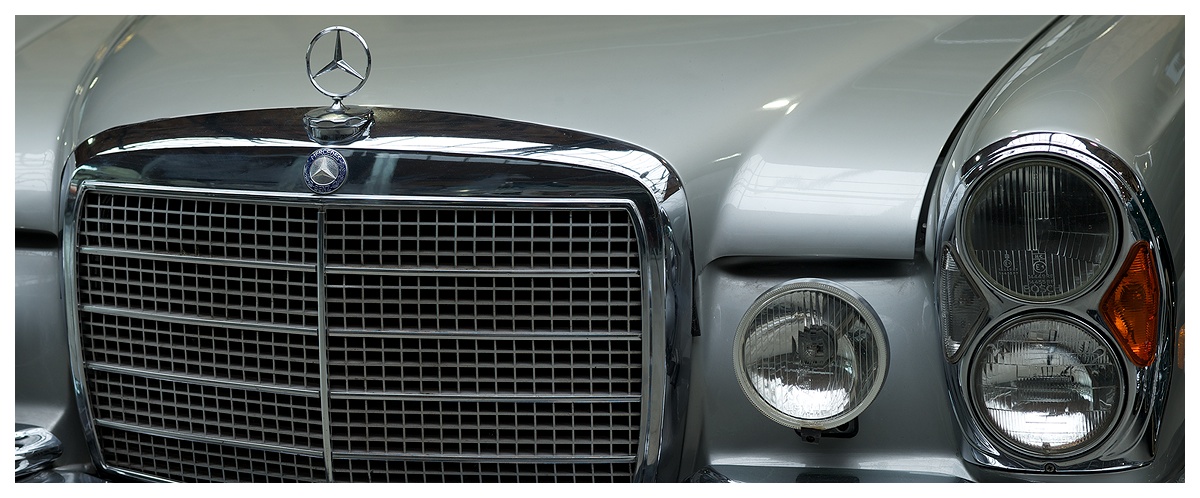
Here is an example process for one of my car panoramas (two shots side by side with 30% overlap):
0) process in Aperture, and Edit in CS4
1) "Smart Sharpen" twice with above settings (Sharpen and USM were too harsh)
2) resize to 68% (61% and 64% brought me to almost exactly twice the final size in the second-last step, so I switched to 68%)
3) "Smart Sharpen" twice (three times brought bright edges)
4) resize to 68%
5) "Smart Sharpen" once
6) resize to 68%
7) "Smart Sharpen" once
8) in this resizing step, I am at 1570 and want to go to 1170, so I type the value directly
9) "Smart Sharpen" once
10) add 15 pixel wide white frame, i.e. Canvas Size and add 30 to each dimension: 1170x468 -> 1200x498
Here is the photo without sharpening, with single-step resizing and "Sharpen" at the end, and with my process. If you open them in separate tabs and switch back and forth, you can see that the first one is soft, the second one is sharp, but has some artifacts and looks a touch harsh, and the third one looks better.


0) process image for colour and everything else
1) sharpen
2) resize
3) if final size has not been reached, go to 1)
4) add frame
For sharpening, I use three tools: "Sharpen", "Unsharp Mask" (120/0.5/5) and "Smart Sharpen" (Basic/120/0.2/Gaussian Blur), and I view some detailed area of the image at full size, i.e. 100% (Cmd+1). I start by trying "Sharpen". If that is too much sharpening, I undo it and do "Unsharp Mask". If that is too much sharpening, I undo it and try "Smart Sharpen". The latter is so gentle that I sometimes need to apply it more than once to see any difference. Once I have stepped from "Sharpen" to "Unsharp Mask", I don't go back in the next steps. Once I have gone from "Unsharp Mask" to "Smart Sharpen", I don't go back in the next steps. In other words, I start with the largest changes, and progressively move to gentler sharpening until done.
The important thing while sharpening is to avoid over-sharpening. It can be hard to detect, but generally, the "Sharpen" and "Unsharp Mask" steps have a tendency to brighten edges, and if you see that, you have gone too far. The problem is that edges brightened in an intermediate step will tend to mix with darker regions and make the photo muddy, once resized.
I have tried various single-step algorithms, but have not yet found a way to get as much nice detail as with this method. Once you get used to it, it takes only a minute or so per photo. It seems like a bit of overhead, but compared to earlier, where I used to post more images of generally lower quality, I now post fewer, better images, and this fits in well with that.
The resize step is just the standard Bicubic, and I normally resize 61%, 64%, 68% or 74% in each step. I try to avoid even divisions (0.5, 0.66, ..) since that would tend to promote artifacts. The resampling which is forced by using an uneven size acts like a gentle AA filter, and is counter-balanced by the sharpening.
Here is an example process for one of my car panoramas (two shots side by side with 30% overlap):
0) process in Aperture, and Edit in CS4
1) "Smart Sharpen" twice with above settings (Sharpen and USM were too harsh)
2) resize to 68% (61% and 64% brought me to almost exactly twice the final size in the second-last step, so I switched to 68%)
3) "Smart Sharpen" twice (three times brought bright edges)
4) resize to 68%
5) "Smart Sharpen" once
6) resize to 68%
7) "Smart Sharpen" once
8) in this resizing step, I am at 1570 and want to go to 1170, so I type the value directly
9) "Smart Sharpen" once
10) add 15 pixel wide white frame, i.e. Canvas Size and add 30 to each dimension: 1170x468 -> 1200x498
Here is the photo without sharpening, with single-step resizing and "Sharpen" at the end, and with my process. If you open them in separate tabs and switch back and forth, you can see that the first one is soft, the second one is sharp, but has some artifacts and looks a touch harsh, and the third one looks better.

")


