The GetDPI Photography Forum

Great to see you here. Join our insightful photographic forum today and start tapping into a huge wealth of photographic knowledge. Completing our simple registration process will allow you to gain access to exclusive content, add your own topics and posts, share your work and connect with other members through your own private inbox! And don’t forget to say hi!

Controlling geometry with rear standard movements

rdeloe

Well-known member
I have a puzzle for people who are old hands at view camera movements.

I have noticed that things I could do with a 4x5 view camera using rear standard movements don't work with small digital sensors and the tools that are available. Two examples are controlling convergence of horizontal lines using rear camera swing, and exaggerating the size of foreground objects using rear tilt.

On cameras like the Cambo Actus and the Arca-Swiss F-Universalis, rear camera swing and tilt were removed to make the camera lighter, simpler, more rigid, and less expensive. If that's the closest you've come to a view camera, then my question might not make sense. A tilt-shift adapter approaches that is locked to the tripod from the front side of the adapter gets a bit closer because tilt and swing happen on the camera side.

Full view camera movements on both standards are less common. You're either using a 4x5 or 6x9 view camera that can fit a digital back, or you're using something like my former Toyo VX23D, which had the full range of movements on both standards and was designed for medium format backs. I adapted a VX23D for a GFX 50R, and could go as wide as 35mm with a retrofocus lens.

Long story short, if you have a copy of Leslie's Stroebel's book, View Camera Technique, this is what I'm talking about regarding using swing to correct converging horizontal lines. This is Figure 2-15 from the 7th edition. Even using my VX23D, which has swing on the rear standard, I was unable to do this.
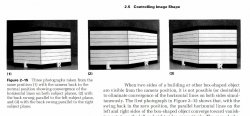
Correcting converging horizontal lines with rear swing.jpg

A more common effect is the exaggerated foreground. Tim Parkin calls this "looming" and wrote about it here. Using tilt-shift adapters, my Toyo VX23d (which has rear standard tilt), and my F-Universalis using the technique he describes for cases where the rear standard doesn't tilt, I cannot replicate the "enlarged succulent" type photograph in this post. https://www.onlandscape.co.uk/2013/03/the-art-of-looming/

EDIT: The reason I can't replicate it is because Tim never said he used a tilt-shift adapter in that post! He describes a 20mm equivalent lens. It could be that he used a 4x5. Anyway, bad reading comprehension on my part.

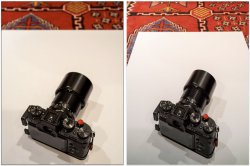
This is my most recent failed attempt, this time using a Fotodiox Tilt ROKR P645 to GFX adapter. On the left is no tilt. On the right is 13 degrees of tilt. I see only minor differences in the shape of the lens, and obviously what's in focus. Looming.jpg
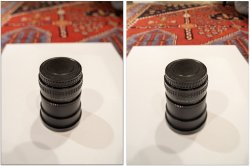
So... my first question to the folks on this forum is, can you make photographs that demonstrate rear standard geometry control? I don't mean in a theoretical "Sure, that ought to be possible" sense. I mean can you actually control geometry with rear standard tilt and swing and a digital sensor in ways that are as dramatic as shown in the kinds of diagrams you find in books like Stroebel?

My second question is, if you don't have the equipment to try it, do you at least know what's going on? Why are things that I could do with a 4x5 view camera not possible with a smaller sensor?
 
Last edited:

Alan

Active member
I do variants of Strobel's swing example all the time with T/S lenses, setting up one point perspective shots. I wonder if it's a matter of available range of movement? I'll take a shot at some comparison images between view camera and T/S lens movements this weekend - something to procrastinate with!

Does it say what focal length is used in that example?
 
Last edited:

MGrayson

Subscriber and Workshop Member
With enough range to the front standards shift, tilt, and swing, anything that can be done with back movements can be replicated with front movements. Not that it's easy, and that "enough" back there may end up being "too much". Simply put, orient the entire camera body so that the sensor is where it would have been had you made rear standard movements, e.g., parallel to one of the walls. Then you have to shift and swing the front standard to where it would have been before moving the back standard. If, and that's a BIG "if", you can achieve that geometry of lens and sensor, then the pictures will be identical.

All the final image cares about is where the sensor and lens are, and how they are oriented. It doesn't care how the camera achieves that.

In the case of the building shown above, you'd need something like 45 degrees of swing with a rear standard, or a HUGE shift of the front element if you re-aimed the camera. Not practical.

With the succulent, you'd have to aim the camera 10 degrees up and then shift the lens VERY far down to get the succulent into the frame. With the Pentax lens image, do you want it to have parallel verticals and a vertical plane of focus? Then aim the camera straight ahead and shift the lens down until the Pentax lens is framed properly. It may not be possible because of limited movement, but that's the geometry you want - both sensor and lens planes vertical and parallel.

Sorry if this is too many words and not enough pictures. The principles are simple. The sensor plane determines geometry. Anything parallel to the sensor will have parallel horizontal and vertical lines. The position and angle of the lens determines the framing and the plane of focus, respectively.
 
Last edited:

anyone

Well-known member
I set up a quick test with my Chamonix field camera. The movements of it are not nearly large enough for such a dramatic effect. That may be the case also with other digital solutions. ( I tried with a coffee box on my table, so hardly representative).
 
Last edited:

Shashin

Well-known member
Not only do I have a copy of Les' book, it is signed. One advantage to having been one of his students.

I would not test on round objects. Use an object with parallel lines. You are most likely not going to have the degree of the swing to replicate it.
 

rdeloe

Well-known member
I do variants of Strobel's swing example all the time with T/S lenses, setting up one point perspective shots. I wonder if it's a matter of available range of movement? I'll take a shot at some comparison images between view camera and T/S lens movements this weekend - something to procrastinate with!

Does it say what focal length is used in that example?
I would love to see that Alan.

In the article he says he's using a 20mm lens, but this was 2013 and there were no 20mm tilt shift lenses for full frame. Tim was into Canon FD on a tilt shift adapter back then, so I'm guessing he's using an APS-C sensor and a Canon FD 20mm lens.

EDIT: Forget all that. He said "20mm equivalent" lens and never mentioned a tilt-shift adapter. It could have been the 4x5 we see in the pictures.
 
Last edited:

rdeloe

Well-known member
With enough range to the front standards shift, tilt, and swing, anything that can be done with back movements can be replicated with front movements. Not that it's easy, and that "enough" back there may end up being "too much". Simply put, orient the entire camera body so that the sensor is where it would have been had you made rear standard movements, e.g., parallel to one of the walls. Then you have to shift and swing the front standard to where it would have been before moving the back standard. If, and that's a BIG "if", you can achieve that geometry of lens and sensor, then the pictures will be identical.

All the final image cares about is where the sensor and lens are, and how they are oriented. It doesn't care how the camera achieves that.

In the case of the building shown above, you'd need something like 45 degrees of swing with a rear standard, or a HUGE shift of the front element if you re-aimed the camera. Not practical.

With the succulent, you'd have to aim the camera 10 degrees up and then shift the lens VERY far down to get the succulent into the frame. With the Pentax lens image, do you want it to have parallel verticals and a vertical plane of focus? Then aim the camera straight ahead and shift the lens down until the Pentax lens is framed properly. It may not be possible because of limited movement, but that's the geometry you want - both sensor and lens planes vertical and parallel.

Sorry if this is too many words and not enough pictures. The principles are simple. The sensor plane determines geometry. Anything parallel to the sensor will have parallel horizontal and vertical lines. The position and angle of the lens determines the framing and the plane of focus, respectively.
Yep, that all sounds good and matches the theory. However....

I used my F-Universalis, which of course has rear rise and shift on the rear standard, but no swing.

Here's the "succulent" test. This kind of sort of worked, but there's no way to do it with the tilt-shift adapter that was available in 2013. You could tilt and shift left/right, or you could swing and rise/fall, but you could not tilt and rise/fall.

The first image is straight on. The second image has me leaning my F-Universalis back (so pointing the lens up), rising the back 25mm, and tilting. The geometry is different, but the camera isn't much larger. If the goal was to create the giant succulent, I wouldn't call this a success.

Looming.jpg

Matt: Your explanation for correcting the horizontals made perfect sense. I slapped my forehead. Of course!

However, implementing this on my equipment is another thing. I tried a variety of lenses and only got this close using a Fujinon GX 125mm f/5.6, which has a circle of good illumination of about 120mm. This hot mess required around 45mm of shift. The only way to get that on an F-Universalis is to use maximum shift on the rear standard (25mm) and then "bonus danger shift" on the front standard. The image circle on the lens wasn't big enough to handle that, and neither was the lens.

Geometry correction.jpg

So what have I learned so far from this?
  1. I do not see how significant foreground exaggeration (looming) is possible with a 2013 tilt-shift adapter because you can't rise after tilt.
    EDIT: As I just added in the original post, Tim never said he used a tilt-shift adapter in his post. My brain just read that in. He says he uses a 20mm equivalent lens, so could easily have been a 4x5 for the succulent shot. Dh'o. That would explain how he pulled off the rise movement.
  2. My Fotodiox Tilt ROKR can't correct horizontals as I did (badly) here because it cannot swing and shift (only swing and rise). The new Kipon ones could swing and shift -- but Pentax 645 can only manage about 10mm of shift.
  3. It's a good thing I don't actually need to do any of these things with my F-Universalis because it's asking too much of the equipment.
  4. This was the right place to ask the question. ;)
Any thoughts on this are most welcome -- especially if I'm doing something wrong. This is not mission critical knowledge for me, but I've always been curious about the limits of the equipment (and my skills) so new knowledge always welcome!
 
Last edited:

MGrayson

Subscriber and Workshop Member
Yep, that all sounds good and matches the theory. However....

I used my F-Universalis, which of course has rear rise and shift on the rear standard, but no swing.

Here's the "succulent" test. This kind of sort of worked, but there's no way to do it with the tilt-shift adapter that was available in 2013. You could tilt and shift left/right, or you could swing and rise/fall, but you could not tilt and rise/fall.

The first image is straight on. The second image has me leaning my F-Universalis back (so pointing the lens up), rising the back 25mm, and tilting. The geometry is different, but the camera isn't much larger. If the goal was to create the giant succulent, I wouldn't call this a success.

View attachment 205886

Matt: Your explanation for correcting the horizontals made perfect sense. I slapped my forehead. Of course!

However, implementing this on my equipment is another thing. I tried a variety of lenses and only got this close using a Fujinon GX 125mm f/5.6, which has a circle of good illumination of about 120mm. This hot mess required around 45mm of shift. The only way to get that on an F-Universalis is to use maximum shift on the rear standard (25mm) and then "bonus danger shift" on the front standard. The image circle on the lens wasn't big enough to handle that, and neither was the lens.

View attachment 205887

So what have I learned so far from this?
  1. I do not see how significant foreground exaggeration (looming) is possible with a 2013 tilt-shift adapter because you can't rise after tilt.
    EDIT: As I just added in the original post, Tim never said he used a tilt-shift adapter in his post. My brain just read that in. He says he uses a 20mm equivalent lens, so could easily have been a 4x5 for the succulent shot. Dh'o. That would explain how he pulled off the rise movement.
  2. My Fotodiox Tilt ROKR can't correct horizontals as I did (badly) here because it cannot swing and shift (only swing and rise). The new Kipon ones could swing and shift -- but Pentax 645 can only manage about 10mm of shift.
  3. It's a good thing I don't actually need to do any of these things with my F-Universalis because it's asking too much of the equipment.
  4. This was the right place to ask the question. ;)
Any thoughts on this are most welcome -- especially if I'm doing something wrong. This is not mission critical knowledge for me, but I've always been curious about the limits of the equipment (and my skills) so new knowledge always welcome!
In the second camera image, the camera is much larger relative to the design on the carpet, so something has changed.
These things are so much simpler theoretically. Unfortunately, theory doesn’t take photos.
 

rdeloe

Well-known member
One thing is for sure: I'm not going back to film so that I can exploit the magic of looming. ;)

I do like to understand things though, so this has been a helpful rabbit hole to dive into. Know the limits of your tools and all that.
 

Alan

Active member
I do like to understand things though, so this has been a helpful rabbit hole to dive into. Know the limits of your tools and all that.
A rabbit hole for sure! I didn’t feel like digging out my Sinar stuff, so used my Arca M2 with a 65mm Grandagon-N and Z7 on the back.

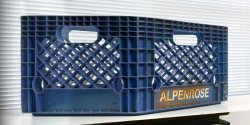
Here’s my attempt at the Stroebel box. This required some serious shenanigans and outright cheating to achieve.

StroebelBoxCheat.jpg

Here’s what it looks like without the cheating, but still plenty of shenanigans. The shot below was compressed horizontally to fit in a 2:3 frame for the image above. If I had used a longer lens, maybe I wouldn’t have had as much elongation?

80mmShift.jpg

Now for the shenanigans...

Like Rob’s Universalis, M2 has angular movements up front and lateral in the back. So, I couldn’t just swing the back - I’d have to swing the whole camera then shift the rear standard back into position. I clamped the rail on the tripod so it would pan about at the front of the lens board, to minimize parallax. This didn’t completely eliminate parallax when panning the camera - more on that later.

Issue #1 - Enough Shift
The M2 has 33mm of designated rear shift. After swinging the camera 45˚ so the back is parallel to one of the faces of the milk crate, it required 80mm of rear shift to get the crate back in frame. To get that much, I had to shift the front format frame in it’s standard clamp and the rotafoot in it’s clamp. Because I shifted the lens, I also moved the camera a bit, attempting to get the lens back to it’s original point in the room (not exactly, still some parallax).

ExtraShift.jpg

Issue #2 - Body Shading
Short version: film or a digital back would work much better for this.

The Z7 has a nice wide, shallow cavity - 16mm flange distance vs the GFX’s 26.7mm. Still, after about 35mm of shift, the body flange starts to cast a shadow on the sensor. The more you shift, the longer the shadow is. So, in order to get a clean unshaded image of the whole crate, I had to incrementally shift and take shots as more of the crate comes into frame, being chased by the shadow. I combined these as layers in PS, erasing the shadow in each layer.

BodyShading.jpg

(There’s also the light falloff/lens cast issue to deal with as you go farther out in the image circle - I’ll skip those details since they don’t have anything to do with the geometric goals here.)

Mystery #1
The above pair still makes sense to me, even with the extreme stretching of the squared-up shot. Unfortunately, I cheated there again. This is what the unshifted shot looks like from the same camera position as the squared one. I had to crop heavily to approximate the same framing. I don’t understand this, and my brain is telling me it’s time to stop thinking about it.

UncroppedStraightShot.jpg

Moving the camera closer fills the frame back up, but of course changes the projected angle of the receding sides of the crate.

65mmCloser.jpg
 
Last edited:

Alan

Active member
Interesting failures and variants! I also shot a series with different focal lengths, running into small image circles and body shading.

Pair19mm.jpg

Pair35mm.jpg

Pair55mm.jpg

Pair65mm.jpg

Pair90mm.jpg

Here's what 80mm of shift looks like:
M2_80mmShift.jpg

And 20mm of shift with a Nikon lens:
M2_19PCE_20mmShift.jpg
 
Last edited:

MGrayson

Subscriber and Workshop Member
Is it that the image with movements is so much larger than the image straight on? That's sideways looming. The sensor plane is passing much closer to the crate , and that's what determines how large something looks, whether it's at the edge of the picture or in the middle. This point cannot be overstressed. Distance to the film plane is the only thing that determines magnification (ignoring things like focus - assume a pinhole camera).

Objects the same distance from the film plane look the same size on the film no matter where they are. Of course, the closer they are to the film, the larger their image will be. (Not shown in picture.)


So let's look at our crate.


The distance from the crate edge to the film is 4, and the image of the red side of the crate has length 0.33...

Swinging the back by 45 degrees greatly reduces the distance from the crate to the film plane, as well as turning to face the film straight on instead of at an angle. As a result, the red side's image now has length 0.98... If the "face on" effect were all that changed, i.e., we only rotated the crate by 45 degrees. the image length would have been 0.467. Getting closer to the film plane is responsible for the rest of the expansion.

You can also see how much the lens has to be shifted to get the image centered if we just rotated the entire camera.


Apologies if this just confuses the issue.

Matt

Edit: Fixed some geometry errors. The effect is even larger than I originally thought.
 
Last edited:

rdeloe

Well-known member
A combined thanks to Alan and Matt for the detailed empirical work (Alan) and modelled explanation (Matt).

Your drawings are superb Matt. You're extremely good at making complex ideas understandable with clear visuals.

Alan: Our experiences are very similar. I ran into the shading problem much sooner than you because of the GFX body's long flange distance and deeper cavity holding the sensor. The top edge of the sensor cavity shows up at around 28mm of shift. I had to use the same tricks to get more shift. When I referred to "bonus danger shift" above -- a very cryptic comment in hindsight! -- I was referring to exactly what you had to do. I had the front standard shoved over as far as it would go, and the Rotafoot was barely in the clamp. It was so far over I held onto the GFX camera the whole time fearing it would drop out of the clamp.

I didn't think to merge images like you did to eliminate the shading. That was clever -- a very nice cheat.

A few take-aways for me include the following....

(1) It's frequently said by people who don't have the equipment and/or don't know how to use it that cameras with movements are an anachronism and unnecessary because you can "do it all in post". I'm not in that camp, obviously, but I have to say this is a case where it's a lot easier to do it in post! Here's a quick adjustment of the straight-on image in Lightroom. Had I planned to do it this way, I would have changed focal lengths to give me enough room for the crop, so this is just a quick-and-dirty transformation.

Done in post.jpg

(2) I've been shooting with view camera movements for over three decades (with some breaks in between). In all that time, I have never had to do this. The reason is obvious if you look at the work on my website. You'd have to go through a lot of galleries to find some that have anything resembling architecture. The one example that's up now was shot entirely with a Ricoh GR and I certainly wasn't interested in correcting verticals or horizontals for that work. https://www.robdeloephotography.com/Works/Small-Projects/Usually-Unseen/

As with any complex tool, it's common to focus only on the functionality we need. My knowledge of Microsoft Word and how to use it is much deeper than most of my colleagues, but I know enough about it to realize there are vast depths I have not plumbed. This fun diversion has been a good exercise in finding the limits of my tools and knowledge in the realm of view camera movements. I use movements in 90% of the pictures I make, but it's all combinations of tilt, swing, and shift to correct composition.

(3) I'm very impressed with the Arca-Swiss F-Universalis. There were some kinks to work out, but now that those are corrected it's nearly perfectly suited to the way I use movements. However, I had no idea how unsuited it would be (with a GFX -- important qualifier) for correcting geometry like this. To Alan's point, I think this would all work better with a back that had close to zero flange distance. Nonetheless, even with a back, the F-Universalis simply doesn't have enough shift. This is where my Toyo VX23D with a film back or a digital back would have come into its own: 25 degrees of swing on both standards, and the ability to shift 60mm when combining movements on the front and rear standards. It's gone now, and honestly not missed because I can't imagine having to do this "for real" unless my direction changes dramatically.
 

cunim

Well-known member
Lots to learn here. I went ahead and just did a practical comparison. I expected the effect to be less with smaller sensors, but the degree to which it is reduced was s surprise. So the issue is whether it matters much if, for some reason, you have to apply a nonparallel movement on the rear.

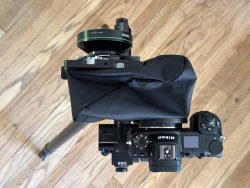
Real world object for me. Top image is rear swing. IQ4, Monolith, Rodenstock, f11. Focus point is the line of stitching on the front of the leather case.

Certainly, the geometric difference is less than I expected, as there was a fair amount of swing applied here. What is interesting is the much greater DOF in the front swung image. Have to get my head around that one.

rear.jpg


front.jpg
 
Last edited:

MGrayson

Subscriber and Workshop Member
Lots to learn here. I went ahead and just did a practical comparison. I expected the effect to be less with smaller sensors, but the degree to which it is reduced was s surprise. So the issue is whether it matters much if, for some reason, you have to apply a nonparallel movement on the rear.

Real world object for me. Top image is rear swing. IQ4, Monolith, Rodenstock, f11. Focus point is the line of stitching on the front of the leather case.

Certainly, the geometric difference is less than I expected, as there was a fair amount of swing applied here. What is interesting is the much greater DOF in the front swung image. Have to get my head around that one.

View attachment 205941

View attachment 205942
I'm a bit confused. Could you describe the amount of swing applied to each standard in each picture? The plane (or wedge) of focus can vary a lot depending.
 

Shashin

Well-known member
It might be useful to point out that Les most likely was using an 8x10 lens with a 4x5 back. He would have had a huge image circle for extreme movements. The example photograph Les uses would imply a long focal length lens as the parallel lines are not converging that much in the normal photograph. This flexibility is difficult to achieve on a digital sensor.
 
Last edited:

rdeloe

Well-known member
It might be useful to point out that Les most likely was using an 8x10 lens with a 4x5 back. He would have had a huge image circle for extreme movements. The example photograph Les uses would imply a long formal length lens as the parallel lines are not converging that much in the normal photograph. This flexibility is difficult to achieve on a digital sensor.
That's an important clarification. Thanks. That's not the kind of thing that anyone could know unless they worked or studied with him -- so it's great to have your first-hand perspective.
 

cunim

Well-known member
I'm a bit confused. Could you describe the amount of swing applied to each standard in each picture? The plane (or wedge) of focus can vary a lot depending.
Matt, I shoulda measured. So I retook the front image and edited the above. Front standard swung about 14' to the optical axis. The object was at about 0.8 m distance and rotated about 35'.

Another interesting point made above is that LF lenses can tolerate this better, especially when working with a smaller format than they are designed for. In my limited experience. this much swing can really tax the image circle capabilities of, for example, my Rodie 120 macro, Sure this object fits in the image circle but the image quality becomes poor as you get out to the periphery. We might actually be better off, as @Sashin suggests, using a LF lens made for 4 x5. It would be less sharp overall, but more consistent over the moved area we want. There are very few (only one I have tried) digital lenses that are consistent not only from edge to edge, but to the outer bounds of the image circle.

Woops, getting off topic.
 

MGrayson

Subscriber and Workshop Member
Matt, I shoulda measured. So I retook the front image and edited the above. Front standard swung about 14' to the optical axis. The object was at about 0.8 m distance and rotated about 35'.

Another interesting point made above is that LF lenses can tolerate this better, especially when working with a smaller format than they are designed for. In my limited experience. this much swing can really tax the image circle capabilities of, for example, my Rodie 120 macro, Sure this object fits in the image circle but the image quality becomes poor as you get out to the periphery. We might actually be better off, as @Sashin suggests, using a LF lens made for 4 x5. It would be less sharp overall, but more consistent over the moved area we want. There are very few (only one I have tried) digital lenses that are consistent not only from edge to edge, but to the outer bounds of the image circle.

Woops, getting off topic.
And was the rear standard rotation in the other image similar? And that was the 120 macro?
 
Last edited:
Top